
Saturday, December 01, 2007
My Rubik
Ok, first and second layer are easy. Below are the steps I follow to finish the third layer and last face.
Saturday, October 06, 2007
Perl script to automatically dowload files from a web site.
I've been reading Learning Perl book from Randal L. Schwartz and just the introduction gave me the tip to automate a task that otherwise would have taken more time.
Again I am installing Asterisk and a Debian box, I have a list of all the necessary files but now Asterisk put all the sounds files on separate files and not in one package as before.
Instead of downloading 31 pages manually I got a the link to all of them, put them on a file (named filesd) one o each line and run the following Perl script:
#!/usr/bin/perl
open (FILESD, filesd);
while ($pathf =){
open (WGET, "wget $pathf");
close (WGET);
}
The filesd file is just a plain file like the one shown below:
ricardo@lmntel01:~/test$ more filesd
http://downloads.digium.com/pub/asterisk/releases/asterisk-1.4.12.1.tar.gz
http://downloads.digium.com/pub/zaptel/releases/zaptel-1.4.5.1.tar.gz
http://downloads.digium.com/pub/libpri/releases/libpri-1.4.1.tar.gz
http://downloads.digium.com/pub/asterisk/releases/asterisk-addons-1.4.3.tar.gz
I know this could have been done with WGET but I got tired of trying to find the correct flag to download them, and I also know there is no error check, report, fancy things and whistles but hey I just finish the introduction.
Again I am installing Asterisk and a Debian box, I have a list of all the necessary files but now Asterisk put all the sounds files on separate files and not in one package as before.
Instead of downloading 31 pages manually I got a the link to all of them, put them on a file (named filesd) one o each line and run the following Perl script:
#!/usr/bin/perl
open (FILESD, filesd);
while ($pathf =
open (WGET, "wget $pathf");
close (WGET);
}
The filesd file is just a plain file like the one shown below:
ricardo@lmntel01:~/test$ more filesd
http://downloads.digium.com/pub/asterisk/releases/asterisk-1.4.12.1.tar.gz
http://downloads.digium.com/pub/zaptel/releases/zaptel-1.4.5.1.tar.gz
http://downloads.digium.com/pub/libpri/releases/libpri-1.4.1.tar.gz
http://downloads.digium.com/pub/asterisk/releases/asterisk-addons-1.4.3.tar.gz
I know this could have been done with WGET but I got tired of trying to find the correct flag to download them, and I also know there is no error check, report, fancy things and whistles but hey I just finish the introduction.
Sunday, September 30, 2007
Eclipse + Perl = Epic
Googling around for a gui ide for Perl I found that there is a plugin for Eclipse. As I also use Eclipse for Java I decided to give it a try and knowing nothing else I found it quite useful. No more of those first vi days (no offense, vi is great but a gui is faster).
You can find about EPIC on http://e-p-i-c.sourceforge.net/, and this time I will not going to explain the installation (as I already installed and didn't took notes) but if you follow their installation manual there is no miss:
http://e-p-i-c.sourceforge.net/downloads/EPIC_User%27s_Guide.pdf
Good luck and if there is a better option let me know and I will give it a try.
Eclipse and Java SDK 1.5 on Debian Etch
As I am still trying to learn java, linux, perl, asterisk and everything I can get distracted with I needed to run eclipse on a new box I set up at home with Debian Etch.
I found the below page quite good on the details on how to achieve this. My steps are copied below:
http://www.crazysquirrel.com/computing/debian/java.jspx
I found the below page quite good on the details on how to achieve this. My steps are copied below:
http://www.crazysquirrel.com/computing/debian/java.jspx
$ apt-get -u install java-package
$ fakeroot make-jpkg java_ee_sdk-5_03-linux.bin
You will see the follwing output:
Creating temporary directory: /tmp/make-jpkg.fktzTQ6486
Loading plugins: blackdown-j2re.sh blackdown-j2sdk.sh common.sh ibm-j2re.sh ibm-j2sdk.sh j2re.sh j2sdk-doc.sh j2sdk.sh j2se.sh sun-j2re.sh sun-j2sdk-doc.sh sun-j2sdk.sh
You will see the follwing output:
Creating temporary directory: /tmp/make-jpkg.fktzTQ6486
Loading plugins: blackdown-j2re.sh blackdown-j2sdk.sh common.sh ibm-j2re.sh ibm-j2sdk.sh j2re.sh j2sdk-doc.sh j2sdk.sh j2se.sh sun-j2re.sh sun-j2sdk-doc.sh sun-j2sdk.sh
Detected Debian build architecture: i386
Detected Debian GNU type: i486-linux-gnu
Detected Debian GNU type: i486-linux-gnu
No matching plugin was found.
Removing temporary directory: done
The above command didn't work with the package java_ee_sdk-5_03-linux.bin so first I tried to make it work. First use the command below to see you have the latest java package installed. I have .28 that is current enough.
$ apt-cache policy java-package | head -2
java-package:
Installed: 0.28
Second try to lie to the installer telling that the installation type if i386 (google arround the message of "plugin not found" and that was the advice). You do this step by entering the following line:
$DEB_BUILD_GNU_TYPE=[i386]-linux fakeroot make-jpkg java_ee_sdk-5_03-linux.bin
The trick is on hte DEB_BUILD_GNU_TYPE that you pass to the process. But as I was still using the java_ee_sdk-5_03-linux.bin from sun it didn't work because the problem was not the plugin but the USER (me) and instead of java_ee_sdk-5_03-linux.bin I should have been using jdk-1_5_0_12-linux-i586.bin. This is the JDK for what make-jpkg was done and after downloading it I was able to make it work.
$fakeroot make-jpkg jdk-1_5_0_12-linux-i586.bin
$fakeroot make-jpkg jdk-1_5_0_12-linux-i586.bin
dpkg-deb: building package `sun-j2sdk1.5' in `/tmp/make-jpkg.trHEuC6948/sun-j2sdk1.5_1.5.0+update12_i386.deb'.
copy sun-j2sdk1.5_1.5.0+update12_i386.deb into directory /home/ricardo/java_source/
The Debian package has been created in the current directory. You can
install the package as root (e.g. dpkg -i sun-j2sdk1.5_1.5.0+update12_i386.deb).
install the package as root (e.g. dpkg -i sun-j2sdk1.5_1.5.0+update12_i386.deb).
Removing temporary directory: done
After that the package is done and now you only need to run dpkg to install it:
$dpkg -i sun-j2sdk1.5_1.5.0+update12_i386.deb
Check your Java Version just in case you have 2 and you have to use alternatives (explained in another blog) to select the Sun one as default and not the GNU one (usually installed but not in this case).
java version "1.5.0_12"
Java(TM) 2 Runtime Environment, Standard Edition (build 1.5.0_12-b04)
Java HotSpot(TM) Client VM (build 1.5.0_12-b04, mixed mode, sharing)
Installing Wireless D-Link DWL-G520+ on Debian etch
I got a desktop pc, nothing fancy and old p4 with 700MB RAM and a 40GB disk. I will be using it at home where I normally use my work Laptop (Latitude D620 with Ubuntu 7.04) and there is wireless access.
Instead of Ubuntu I installed Debian on it, I downloaded the netinstall of Debian 4 (etch) and did the basic installation. For the first step I did the installation in the office connecting the pc to the network as I am not good doing everything from zero.
Once the pc was up and running I started investigating about my wireless card. I am using a D-Link DWL-G520+. I has been working great on a windows box for the last year and was time to move it to linux.
Looking around you find two main options (although I found some new drivers) using ndiswrapper and acx100.
Much of the googling I read mentioned that acx100 was the correct one for the g520 so I install that one. The installation is simple enough and the steps are below. Note that I've been using it for the last 24hrs and I am not happy with it. I even try to put the Ubuntu install cd and forget about debian/acx100 as the connection fails every now and them (I have on my desk my laptop and this pc and while the pc fails some times and have to either restart X or reboot the machine due a complete freeze the laptop stays connected all the time, arghhh).
The information on how to install the driver ison the acx100 wiki page. The steps I followed are listed below:
http://acx100.sourceforge.net/wiki/Distribution_list/Debian
(as root)
# apt-get update
# apt-get install acx100-source wireless-tools
# module-assistant prepare
(the below step is a menu driven, you have to build the acx100 module)
# module-assistant # It will show a menu to build and install it.
|---> Select / acx100 / Build
|----> Yes
|----> Yes
# modprobe acx
#vi /etc/network/interfaces
Instead of Ubuntu I installed Debian on it, I downloaded the netinstall of Debian 4 (etch) and did the basic installation. For the first step I did the installation in the office connecting the pc to the network as I am not good doing everything from zero.
Once the pc was up and running I started investigating about my wireless card. I am using a D-Link DWL-G520+. I has been working great on a windows box for the last year and was time to move it to linux.
Looking around you find two main options (although I found some new drivers) using ndiswrapper and acx100.
Much of the googling I read mentioned that acx100 was the correct one for the g520 so I install that one. The installation is simple enough and the steps are below. Note that I've been using it for the last 24hrs and I am not happy with it. I even try to put the Ubuntu install cd and forget about debian/acx100 as the connection fails every now and them (I have on my desk my laptop and this pc and while the pc fails some times and have to either restart X or reboot the machine due a complete freeze the laptop stays connected all the time, arghhh).
The information on how to install the driver ison the acx100 wiki page. The steps I followed are listed below:
http://acx100.sourceforge.net/wiki/Distribution_list/Debian
(as root)
# apt-get update
# apt-get install acx100-source wireless-tools
# module-assistant prepare
(the below step is a menu driven, you have to build the acx100 module)
# module-assistant # It will show a menu to build and install it.
|---> Select / acx100 / Build
|----> Yes
|----> Yes
# modprobe acx
If you want you could load the driver automatically with:
#echo acx >>/etc/modules
#cp tiacx111c16 /lib/firmware/`uname -r`/acx/1.2.1.34
(manually created `uname -r`/acx )
(manually created `uname -r`/acx )
#vi /etc/network/interfaces
# The wireless network interface
allow-hotplug wlan0
iface wlan0 inet dhcp
#shutdown -r now
That was it, after the reboot the machine detected the wireless networks around. Selected mine and enter password and was logged (again I fails time to time).
allow-hotplug wlan0
iface wlan0 inet dhcp
#shutdown -r now
That was it, after the reboot the machine detected the wireless networks around. Selected mine and enter password and was logged (again I fails time to time).
Monday, September 10, 2007
Synergy 1.3.1 Windowz XP and Ubuntu 7.04
For the last weeks I've been using my laptop with Ubuntu and my office desktop with the corporate windows xp. I was using the Terminal Server Client to work on my desktop but switching between windows was quite boring.
In the past when I used to have windows on boths boxes I run synergy to share the keyboard/mouse but didn't install it yet.
First thing the sudo apt-get install synergy althouth it didn't show any error it didn't show any success either so I remove it.
Next googling around I found the following link with a good explanation on what to do to get started, the link is: https://help.ubuntu.com/community/SynergyHowto
So the steps are:
a) download Synergy the tar.tz from the Synergy project page http://synergy2.sourceforge.net/. The direct link is:
http://kent.dl.sourceforge.net/sourceforge/synergy2/synergy-1.3.1.tar.gz
Untar the file on your home directory.
b) Next install necessary libraries:
The configuration is quite easy, I have to say that easier than setting this between to windows boxes. Basically you say which are your 2 boxes and then where is which one respecting the other.
Here you have to use the hostname of your linux box and the name of the windowz box you set up on the windowz client.
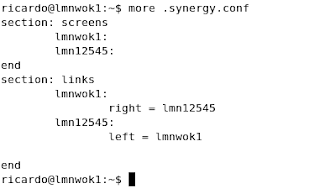
So my synergy.conf looks like this:
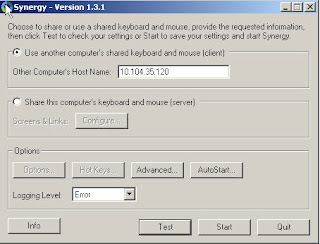
On the windows machine you set up the ip/hostname (you choose) of your linux box and click on the advance button at the end to set up the name assigned to this machine:
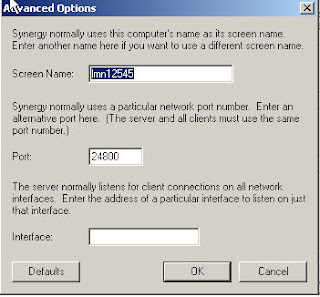
On the advance settings just check the name, if you are having problems just make sure that the name on the below screen is the same as the one on the synergy.conf on your linux box. If they are not the same you will get errors on your client machine.
After this run the server synergys --config synergy.conf from your command line (check previous page you can mv the synergy.conf to your home directory and just run synergy) and start the client, you should be able to use your linux mouse/keyboard on both boxes!!!
Please read the document from the ubuntu documentation mentioned above.
Regards
Richard
In the past when I used to have windows on boths boxes I run synergy to share the keyboard/mouse but didn't install it yet.
First thing the sudo apt-get install synergy althouth it didn't show any error it didn't show any success either so I remove it.
Next googling around I found the following link with a good explanation on what to do to get started, the link is: https://help.ubuntu.com/community/SynergyHowto
So the steps are:
a) download Synergy the tar.tz from the Synergy project page http://synergy2.sourceforge.net/. The direct link is:
http://kent.dl.sourceforge.net/sourceforge/synergy2/synergy-1.3.1.tar.gz
Untar the file on your home directory.
b) Next install necessary libraries:
sudo apt-get install libxtst-dev
sudo apt-get install build-essential
c) Now configure this but specify the location of the libraries.. if not an error of X cannot be found will appear.
sudo ./configure -x-libraries /usr/lib -x-includes /usr/includes
sudo make install
d) The previous step created synergc (client) and syngers (server) on your home director. The webpage mentioned below ask us to move the mto /user/bin so we do a:
sudo mv /usr/local/bin/synergyc /usr/bine) The next step is to configure synergy. The system uses a file called synergy.conf , there is an example on the installation folder at /synergy-1.3.1/examples/synergy.conf.
sudo mv /usr/local/bin/synergys /usr/bin
The configuration is quite easy, I have to say that easier than setting this between to windows boxes. Basically you say which are your 2 boxes and then where is which one respecting the other.
Here you have to use the hostname of your linux box and the name of the windowz box you set up on the windowz client.
So my synergy.conf looks like this:

On the windows machine you set up the ip/hostname (you choose) of your linux box and click on the advance button at the end to set up the name assigned to this machine:

On the advance settings just check the name, if you are having problems just make sure that the name on the below screen is the same as the one on the synergy.conf on your linux box. If they are not the same you will get errors on your client machine.

After this run the server synergys --config synergy.conf from your command line (check previous page you can mv the synergy.conf to your home directory and just run synergy) and start the client, you should be able to use your linux mouse/keyboard on both boxes!!!
Please read the document from the ubuntu documentation mentioned above.
Regards
Richard
Wednesday, September 05, 2007
Configuring Minicom on Ubuntu to connect to Cisco Router
Ok, that was a large title for this task but what the heck. What needs to be done to achieve this? We need a piece of software called minicom (this has been around for ages, google it and you will learn a lot) and follow the next steps shown below:
a) install minicom and follow the normal procedures
sudo apt-get isntall minicom
b) check your serial ports.
We need to know the serial ports on your machine, so a dmseg would do the trick. Look for ttyS and take note of the number after it, in my case I have ttyS0 ready to use.
richard@wok:~$ dmesg|grep ttyS
[ 1.430818] serial8250: ttyS0 at I/O 0x3f8 (irq = 4) is a 16550A
[ 1.431528] 00:0c: ttyS0 at I/O 0x3f8 (irq = 4) is a 16550A
richard@wok:~$
c) launch minicom as root
$sudo minicom
You will see a page as the one below. The first lines shows the configuration (I already modified mine, so yours must be the default ones).

c) Press control + a and Z to go to the menu. The first thing we will change is the dialing string so select the letter "O" for "command string" on the below menu.

d) The previous step should have brought you to the image below. With the arrows keys select "Modem and dialing" and press enter.

e) Now you are on the image below. Press A to set the cursor on the first line and delete everything (I use to have the following configuration ~^M~AT S7=45 S0=0 L1 V1 X4 &c1 E1 Q0^M ). One done press ESC or RETURN to go back to the menu.

f) Now back on the menu select "Serial Port Setup" with the arrow keys.

g) Using the letters configure the options:
A - For Serial Device
E - For Bps/Par/Bits
Copy the configuration below, the option "E" will bring a new menu where you select the details. The option A has to match with what you find on the dmseg step "b" of this guide.

h) Exit to the main menu and reset minicom. Restart it so the changes would take effect (maybe there is an option to make the changes live without restarting minicom but this is a small step).
After rebooting minicom with the Cisco router connected with the blue cable to your pc/laptop just turn the Cisco on and you will see the details on the screen and you are good to go. Example below:

I will add more details/tips along the way.
As always good luck!
Saturday, September 01, 2007
FTP Server: Proftpd
I put a server to share files with friends and I had in my hands a little project on how to share them. For this time I chose to use the always friendly FTP service. Googling around I found Proftpd as one of the heavyweights for this and decided to install it. It can be found at: http://www.proftpd.org/.
I am using Debian, 3.1 with kernel 2.6.22.6. Installation thanks to apt is quite easy..
a) apt-get install proftpd .. that was it. no more. (there is a question on installing as inetd or standalone, you should choose your favorite).
The next steps were to set it up so I can create ftp users "virtual" without shell access (they are not that good friends!) and limit them to upload/download only in certain directories.
First add the following on /etc/proftpd/proftpd.conf
# Set /home/FTP-shared directory as home directory
DefaultRoot /media/muploads
# Lock all the users in home directory, ***** really important *****
DefaultRoot ~
AuthUserFile /etc/proftpd/ftpd.passwd
AuthGroupFile /etc/proftpd/ftpd.group
Umask 022 022
AllowOverwrite off
DenyAll
Umask 022 022
AllowOverwrite off
DenyAll
/media/muploads/uploads/>
Umask 022 022
AllowOverwrite on
DenyAll
The directories /media/muploads/uploads and /media/muploads/downloads should exist already.
Second you have to create the users. For this you need to download a file called ftpasswd. This script would be used to create 2 files, ftp.passwd and ftp.group. Both files replaces the system group and passwd files. Read the documentation to learn more about them.
ftpasswd --passwd --name=user --uid=501 --gid=500 --home=/media/muploads --she
ll=/bin/false
ftpasswd --group --name=ftpvirt --gid=500 --member=user
The first command with the --passwd flag will ask you for a password for the user "user", just add it.
The next step is to add the shell /bin/false to the /etc/shells file. If this step is not done when user "user" tries to log in it would get an error as the shell doesn't exist. Note that the shell actually doesn't exist as we don't want the uses to telnet or ssh to the pc but adding the line /bin/false to the file solves the problem.
The final step is to change the permissions of the directories.
on /media/muploads do a:
chown 500:501 downloads
chown 500:501 uploads
chmod 777 uploads
The userid and groupid are the same for all users and directory. It doesn't matter that they don't exists (keep an eye if you have several users not to use this ids). The chmod 777 is quite extreme and you should use something more secure.
The result, an ftp server that allows connections from virtual users. Diverts them directory to a general home directory and not systems home directories and that are allowed to download from one directory and only upload into another.
As always I am sure there are security holes the size on the moon on this procedure but it is a start.
I am using Debian, 3.1 with kernel 2.6.22.6. Installation thanks to apt is quite easy..
a) apt-get install proftpd .. that was it. no more. (there is a question on installing as inetd or standalone, you should choose your favorite).
The next steps were to set it up so I can create ftp users "virtual" without shell access (they are not that good friends!) and limit them to upload/download only in certain directories.
First add the following on /etc/proftpd/proftpd.conf
# Set /home/FTP-shared directory as home directory
DefaultRoot /media/muploads
# Lock all the users in home directory, ***** really important *****
DefaultRoot ~
AuthUserFile /etc/proftpd/ftpd.passwd
AuthGroupFile /etc/proftpd/ftpd.group
Umask 022 022
AllowOverwrite off
DenyAll
Umask 022 022
AllowOverwrite off
DenyAll
Umask 022 022
AllowOverwrite on
DenyAll
The directories /media/muploads/uploads and /media/muploads/downloads should exist already.
Second you have to create the users. For this you need to download a file called ftpasswd. This script would be used to create 2 files, ftp.passwd and ftp.group. Both files replaces the system group and passwd files. Read the documentation to learn more about them.
ftpasswd --passwd --name=user --uid=501 --gid=500 --home=/media/muploads --she
ll=/bin/false
ftpasswd --group --name=ftpvirt --gid=500 --member=user
The first command with the --passwd flag will ask you for a password for the user "user", just add it.
The next step is to add the shell /bin/false to the /etc/shells file. If this step is not done when user "user" tries to log in it would get an error as the shell doesn't exist. Note that the shell actually doesn't exist as we don't want the uses to telnet or ssh to the pc but adding the line /bin/false to the file solves the problem.
The final step is to change the permissions of the directories.
on /media/muploads do a:
chown 500:501 downloads
chown 500:501 uploads
chmod 777 uploads
The userid and groupid are the same for all users and directory. It doesn't matter that they don't exists (keep an eye if you have several users not to use this ids). The chmod 777 is quite extreme and you should use something more secure.
The result, an ftp server that allows connections from virtual users. Diverts them directory to a general home directory and not systems home directories and that are allowed to download from one directory and only upload into another.
As always I am sure there are security holes the size on the moon on this procedure but it is a start.
Installing new hard disk on Debian
I got a new disk 40GB disk (found it on the office ether of unused stuff) and installed it on my little Debian server that only has a 20GB disk on it.
The usage of the new disk would be something very productive for the organization, we will use it to share movies!. Ok probably IT Security will kick my ass if they found out but we will deal with that later.
So the steps to add the disk are quite simple. This is an IDE disk and the first step is to connect the hardware (power, ide cable etc). Power up and the fun begins.
a) run fdisk /dev/hdb to partition the disk (check dmseg to see the name it has, in my case hdb that is the standard).
b) on fdisk I just created a primary partition and used 100% of the disk. This depends on the purpose of the disk so study your options. Once the partition is created quit fdisk saving the changes.
c) next step is to format the partition. I am using ext3 so the command to run is
mkfs.ext3 /dev/hdb1
d) next you create a mount partition
mkdir /media/muploads
e) next you mount the disk
mount /dev/hdb1 /media/muploads
f) finally change your fstab settings so the disk is mounted on every boot.
vi /etc/fstab
add the following line
/dev/hdb1 /media/muploads ext3 defaults 0 2
That was all. I am sure betting things can be done for RAID, etc. Notes are welcome (almost).
Good luck
Book: Five Years at the Epicenter of the Dot.Com Juggernaut

I just finished reading this book - Five Years at the Epicenter of the Dot.Com Juggernaut by James Marcus - and unfortunately I couldn't see the put my experience on the authors tale. I enjoyed the book and found it amusing and educational on my search to see how business are made but as I work on a dot.com myself I was hoping to find an outside look of what I daily see.
My work on a dot.com is not as glamorous as James's but I believe I leave my footprint on the not so "dot.com" part of the business (after all I am a telephony administrator/engineer on it) and also I have to say and I join the on the late shift (5 years after the company appear) so I was not on the stock options group - although I new some of them and when the company was finally bought there were no millionaires on the building except the top execs - as he was.
Going back to the book, first I would like to write reviews like his but this is just a group of characters put together in bad sentences with what is on my head, so Sorry James!. I leave the book with the wish to read as much as possible. I love the passion on reading the author has and shows on his writing. I consider myself lucky to be able to read more than 15 books a year that although I know is nothing - my father easily reads 4/5 times that number - is much more than all the people I know. I want to start reading the not so marking books, most of my reading is bestseller top shelf nice cover good reviewed type of book. I want to read and enjoy those not so known authors that haven't sold their souls to the publishing machinery, it is just september so I still have a chance to get it.
Another point of the book that I didn't like was that the book could have been about a beer factory and not one of the pioneers on the tech boom. I know the author mentions it all the time but every business wants to revolutionize his market anyway so if you replace the amazon for other success history the books remain the same. What I am trying to see is that I see it more as a history about corporate work than a specific book about working in amazon. Again sorry James but I don't think you will never read this anyway, I really think nobody would ever read this in fact!
In summary a good read, I like books like The Search or Google more to learn about dot.com companies but I recommend the book (this is my editorial at the end!) to everybody.
Friday, August 24, 2007
Another Asterisk 1.4.11 installation
I haven't tested this installation at the time of the post (want to leave the office!!) but as always I keep my notes here to go back my steps later if needed.
The installation is simple as always.
a) Check version of GNU Make is greater than 3.79, just run
rbtest:/home/ricardo/asterisk_intall# make -v
GNU Make 3.81
b) Install some dependencies (errors show during the installation of pwlib)
$ apt-get install libldap2-dev
configure: error: pwlib needs the GNU Project fast lexical analyzer generator flex
$ apt-get install flex
configure: error: pwlib needs the GNU Project parser generator bison
$ apt-get install bison
19 apt-get install kernel-packages ncurses-dev fakeroot bzip2
20 apt-get install kernel-package ncurses-dev fakeroot bzip2
21 apt-get install yaird fakeroot
22 apt-get install make-kpkg kernel_image
23 apt-get install kernel_image
24 apt-get install sudo
25 apt-get install iniramfs-tools
26 apt-get install initramfs-tools
27 apt-get install bzip2
28 apt-get install libncurses-dev
30 ap-get install wget
35 apt-get install linux-headers-`uname -r` build-essential libnewt-dev libusb-dev
c) Download packages asterisk:
rbtest:/home/ricardo/asterisk_intall# ls -ltr
total 16772
-rw-r--r-- 1 ricardo ricardo 11218944 2007-08-24 16:25 asterisk-1.4.11.tar.gz
-rw-r--r-- 1 ricardo ricardo 1563752 2007-08-24 16:25 zaptel-1.4.5.1.tar.gz
-rw-r--r-- 1 ricardo ricardo 81178 2007-08-24 16:25 libpri-1.4.1.tar.gz
-rw-r--r-- 1 ricardo ricardo 1000286 2007-08-24 16:26 asterisk-addons-1.4.2.tar.gz
-rw-r--r-- 1 ricardo ricardo 3249876 2007-08-24 16:26 asterisk-sounds-1.2.1.tar.gz
drwxr-xr-x 2 root root 4096 2007-08-24 18:03 libpri-1.4.1
drwxr-xr-x 24 root root 4096 2007-08-24 19:11 asterisk-1.4.11
drwxr-sr-x 14 root root 12288 2007-08-24 19:21 zaptel-1.4.5.1
rbtest:/home/ricardo/asterisk_intall#
d) Download packages openh323
wget http://downloads.sourceforge.net/openh323/pwlib-v1_10_3-src-tar.gz
wget http://downloads.sourceforge.net/openh323/openh323-v1_18_0-src-tar.gz
rbtest:/home/ricardo/openh323_install# ls -ltr
total 5704
-rw-r--r-- 1 root root 3742730 2006-03-26 12:28 openh323-v1_18_0-src-tar.gz
-rw-r--r-- 1 root root 2079871 2007-01-25 00:01 pwlib-v1_10_3-src-tar.gz
drwxr-xr-x 9 1010 3000 4096 2007-08-24 18:28 pwlib_v1_10_3
drwxr-xr-x 7 1010 3000 4096 2007-08-24 18:40 openh323_v1_18_0
rbtest:/home/ricardo/openh323_install#
e) Install Openh323
tar zxvf pwlib-v1_10_3-src-tar.gz
cd pwlib_v1_10_3/
./configure
make
export PWLIBDIR=/home/ricardo/openh323_install/pwlib_v1_10_3
cp $PWLIBDIR/lib/libpt_linux_x86_r.so.1.10.3 /usr/lib
cd ..
It is very important that you set the PWLIBDIR to your path, othewise OpenH323 will not find it.
tar zxvf openh323-v1_18_0-src-tar.gz
cd openh323_v1_18_0/
./configure
make opt
export OPENH323DIR=/home/ricardo/openh323_install/openh323_v1_18_0
cp $OPENH323DIR/lib/libh323_linux_x86_r.so.1.18.0 /usr/lib
Aain we must set the OPENH323DIR variable, so Asterisk can know here to look for OpenH323. We copy the library manually to the system directory, as we do not care about the rest of OpenH323 features.
f) Install zaptel, libpri, asterisk
tar zxvf zaptel-1.4.4.tar.gz
cd zaptel-1.4.4
./configure
make menuselect
At this point use the menuselect utility to select which Zaptel hardware - if any - you have on board. Please remeber that if you want to exit keeping the changes you made, you must press x, while q will quit without saving and the left arrow will get you back to the previous menu. Even if you do not have Zaptel hardware, you should compile the ztdummy driver.
make
make install
Now we install libpri
tar zxvf libpri-1.4.1.tar.gz
make
make install
cd ..
Now we build Asterisk itself:
tar zxvf asterisk-1.4.8.tar.gz
./configure
make menuselect
At this point, you should go to the Channels menu and see that H323 is enabled. If it's not, vey likely you did not set OPENH323DIR or PWLIBDIR, so configure cannot enable H.323 by default.
make
You will get the following error, so run the make again:
When compiling with H.323 support, the first time you run make it will end with an error telling you to run make again. This is okay, just do it as it says.
***************************************************************
********** Re-run 'make' to pick up H.323 parameters **********
***************************************************************
make[1]: *** [h323/libchanh323.a] Error 1
make
make install
make samples
cd ..
This should be it. I checked that my /etc/zaptel.conf was missing. Not sure if this is because I didn't have any hardware installed. Just in case I copied
150 cp /home/ricardo/asterisk_intall/zaptel-1.4.5.1/zaptel.conf.sample /etc/zaptel.conf
Run the moprobe on zapte/ztdummy
151 modprobe zaptel
152 lsmod
153 modprobe ztdummy
154 lsmod
Change the default zone on zaptel.conf to UK
156 vi /etc/zaptel.conf
Run the configuration and obviously 0 boards configured message appear:
157 ztcfg -v
Started Asterisk
158 asterisk -vvvvvvvvvvvvvvvvvvvvvvvvvvc
Will test this solution. Will do the installation of add-ons and sounds later as add-ons brings an h323 solution by itself.
Enabling H.323
In order to enable H.323, you simply edit /etc/asterisk/h323.conf as follows:
gatekeeper = DISCOVER
context=h323
This will tell it to find the gatekeeper automatically and to route incoming calls to context h323.
To place an outbound call fron Asterisk, you just dial:
exten => 21,1,Dial(h323/21)
This will find the terminal 21 through the Gatekeeper and will call it as needed.
Main article retrieved from:
http://astrecipes.net/index.php?n=286
Thursday, August 23, 2007
Install Sun Java on Ubuntu 7.04
The installation of Java is quite easy. The default installation has the GNU version of Java, to run Sun engine first install the following packages:
sudo apt-get install sun-java6-jre sun-java6-plugin sun-java6-fonts
Then check the version of Java running, the GNU version should still be the default one:
ricardo@lmnwok1:~$ java -version
java version "1.4.2"
gij (GNU libgcj) version 4.1.2 (Ubuntu 4.1.2-0ubuntu5)
Copyright (C) 2006 Free Software Foundation, Inc.
This is free software; see the source for copying conditions. There is NO
warranty; not even for MERCHANTABILITY or FITNESS FOR A PARTICULAR PURPOSE.
ricardo@lmnwok1:~$
To select the new Sun engine run the update-alternatives as below and select the option you want to use:
ricardo@lmnwok1:~$ sudo update-alternatives --config java
There are 3 alternatives which provide `java'.
Selection Alternative
-----------------------------------------------
1 /usr/bin/gij-wrapper-4.1
2 /usr/lib/jvm/java-6-sun/jre/bin/java
*+ 3 /usr/lib/jvm/java-gcj/jre/bin/java
Press enter to keep the default[*], or type selection number: 2
Using `/usr/lib/jvm/java-6-sun/jre/bin/java' to provide `java'.
ricardo@lmnwok1:~$
Now when checking the version you will see the new one:
ricardo@lmnwok1:~$ java -version
java version "1.6.0"
Java(TM) SE Runtime Environment (build 1.6.0-b105)
Java HotSpot(TM) Client VM (build 1.6.0-b105, mixed mode, sharing)
ricardo@lmnwok1:~$
After this as in my other post change the JRE used by Eclipse.
Tuesday, August 21, 2007
Ubuntu 7.04 on Dell Latitude D620
I got that urge again of installing linux on my laptop. I've been using Fedora in the past but after the latest crash (that needed to get a new hard disk but I had to admit that I don't know if Fedora crash the disk or the disk crash Fedora) and as I normally install Debian on the servers (and due all the people I know and magazines and post I have read about Ubuntu) I decided to install Ubuntu on my laptop.
I went to the Ubuntu site and downloaded the image for the CD, run it on my laptop and first I was surprised about the installation process. Normally I install windows, leave enough space for Linux and then install Linux on the free space.
Ubuntu is different from the start. The cd is a LiveCD, once it is loaded on the desktop there is a shortcut to install Ubuntu. You click on it and you go on with the wizard. The only part that you have to keep an eye is on the disk partitioning. The automatic wizard resize existing file disk option didn't work (some kind of error) a friend at the office mentioned that he had the same problem and selected the option to do it manually. I choose it and altered my windows partition and it did an automatic resize of it (don't know if it worked as I haven't use my windows partition yet), once you have enough space you create you swap and you other mounting points. As this is my first attempt I created only "swap" and "/".
Next the installation is quite simple, once finished I run this two install packages:
# sudo apt-get install 915resolution (reboot)
On which you need to edit the /etc/default/915resolution file.
And...
# sudo apt-get install network-manager-pptp
I am still playing with this last one.
I will add more notes later as soon as I get my feet wet on Ubuntu (first thing I noticed is that I have to sudo everything.. I miss root)
I went to the Ubuntu site and downloaded the image for the CD, run it on my laptop and first I was surprised about the installation process. Normally I install windows, leave enough space for Linux and then install Linux on the free space.
Ubuntu is different from the start. The cd is a LiveCD, once it is loaded on the desktop there is a shortcut to install Ubuntu. You click on it and you go on with the wizard. The only part that you have to keep an eye is on the disk partitioning. The automatic wizard resize existing file disk option didn't work (some kind of error) a friend at the office mentioned that he had the same problem and selected the option to do it manually. I choose it and altered my windows partition and it did an automatic resize of it (don't know if it worked as I haven't use my windows partition yet), once you have enough space you create you swap and you other mounting points. As this is my first attempt I created only "swap" and "/".
Next the installation is quite simple, once finished I run this two install packages:
# sudo apt-get install 915resolution (reboot)
On which you need to edit the /etc/default/915resolution file.
MODE=Auto
XRESO=1440
YRESO=900
BIT=
XRESO=1440
YRESO=900
BIT=
And...
# sudo apt-get install network-manager-pptp
I am still playing with this last one.
I will add more notes later as soon as I get my feet wet on Ubuntu (first thing I noticed is that I have to sudo everything.. I miss root)
Tuesday, July 10, 2007
Book: Hardvard Business Review on Innovation
 This is basically a compilation of articles that appeared on the HBR magazine. The articles present on this book are:
* Creating New Market Space
* Creating Breakthroughs at 3M
* Building an Innovation Factory
* Knowing a Winning Business Ida When You see One
* Meeting the Challenge of Disruptive Change
* Discovering New Points of Differentiation
* From Spare Change to Real Change: The Social Sector as Beta Site for Business Innovation
* Enlightened Experimentation: The New Imperative for Innovation
What did I learn from it? Consciously not much, the book started very well but it became boring or not that enlightening at the end so it took me much more time to finish it than expected (as falling sleep while reading a single page).
But what it left me with 2 mayor notes, the way to innovation is breaking models and managers solve but innovator leads (or similar). I am sure that if one day I do the change from my low technically emotional job working under and with completely useless people in my opinion, I will read it again quickly to remember the tips it gives on how to think.
Also the fact that they sell a book at almost 20U$D made of articles from a magazine that they already sold (physically, on the web, subscription, pamphlets, umbrellas, etc) gives a little of faith on the innovation of this guys.
So do I recommend it? Yes but as quick read.
Wednesday, July 04, 2007
Book: Stories of Your Life and Others

Stories of Your life and Others by Ted Chiang might be the second science fiction book I read in the last two years and I recommend it to everyone. The previous one was "The Hitchhiker's Guide to the Galaxy" but I liked Chiang's writing better.
I might be doing a comparison of rocks and apples here but the different writing stiles of each history make it great. I was impressed with one of them about a man whose intelligence gets increase on where the writing makes your heart beat accelerate and takes you to a journey were you can feel how the main character is feeling things.
All stories were great and unique making you think, dream and look back. Again a book recommended to all. By the way you have no idea how much it took me to upload the image of the cover of the book (copyright to the owner, publicist, etc, etc), kind of spooky maybe the fiction is should not be before the science.
Read, explore, open new windows and get lost as much as possible!
(As always all images, etc are copyright by the owner and this never happened)
Tuesday, June 26, 2007
Boring notes of day to day Linux
These are just some notes from my last asterisk installation (done on may 15th but notes lost between all the desktop files) and they are here because man is the only animal that stumbles on the same rock and even worst I am far away to grew up.
a) Usefull installations for debian:
apt-get install mc bzip2 zip unzip ngrep iproute less
b) Some detatails on debian networking:
Networking:
rbast:/etc/network# pwd
/etc/network
rbast:/etc/network# more interfaces
# This file describes the network interfaces available on your system
# and how to activate them. For more information, see interfaces(5).
# The loopback network interface
auto lo
iface lo inet loopback
# The primary network interface
allow-hotplug eth0
iface eth0 inet dhcp
rbast:/etc/network#
Could be changed to:
This file describes the network interfaces available on your system
# and how to activate them. For more information, see interfaces(5).
# The loopback network interface
auto lo
iface lo inet loopback
# The primary network interface
auto eth0
iface eth0 inet static
address 10.0.2.51
netmask 255.255.255.0
gateway 10.0.2.254
c) how to open bz2 files (I always forget!!!)
tar -xjvf asterisk_settings.tar.bz2
d) I got an autoconf error
autonf error: solved by installing atuconf (apt-get) and running make config.
232 make
233 make config
234 make install
235 history
e) I got a cc1plus error
Asterisk installation: Got an error related to cc1plus while doing the .configuration. I apt-geted the packaged and worked.
apt-get install build-essential
f) Finally booting Asterisk at start time:
147 cd /etc/init.d/
148 cp /usr/src/asterisk-1.4.4/contrib/init.d/rc.debian.asterisk ./asterisk
149 ls
150 update-rc.d asterisk defaults
It should display the following output:
rbast:/etc/init.d# update-rc.d asterisk defaults
Adding system startup for /etc/init.d/asterisk ...
/etc/rc0.d/K20asterisk -> ../init.d/asterisk
/etc/rc1.d/K20asterisk -> ../init.d/asterisk
/etc/rc6.d/K20asterisk -> ../init.d/asterisk
/etc/rc2.d/S20asterisk -> ../init.d/asterisk
/etc/rc3.d/S20asterisk -> ../init.d/asterisk
/etc/rc4.d/S20asterisk -> ../init.d/asterisk
/etc/rc5.d/S20asterisk -> ../init.d/asterisk
rbast:/etc/init.d# history
Monday, June 25, 2007
Must have applications for your Windows PC
Below is a list of applications that do my work and windows experience more easy. They are not sorted in any particular order and note that they are all light applications, no hundreds of MB involved.
Total commander - http://www.ghisler.com/
A clon of the famous Norton commander used long time ago (yes I am that old and also you can have mc on your Linux) that you can use to manage your files, ftp, connect to other boxes, etc. Visit the website and go back in time where things were simpler.
Cerberus - http://www.cerberusftp.com/
An FTP server easy and quickly to run on you pc.
Snagit - http://www.techsmith.com/screen-capture.asp
A must have if you have to send documents with manuals or showing users what to do. Easily capture your screen, edit it, modified it, copy it and just send it or paste it or save it in whichever format you want.
Textpad - http://www.textpad.com/
A text editor to replace the old notepad on which you cannot do much. If you deal with logs and simple files and want to do searchs, compares, replaces, etc. this is the tool for you (other textedit or vim for windows but I always go back to Textepad).
Putty - http://www.chiark.greenend.org.uk/~sgtatham/putty/
Not sure if this is the right site where to download it but Google for it. A great and complete telnet and ssh and others. Very useful to replace the windows telnet.
Videolan - http://www.videolan.org/
This is to reproduce video files of all types (almost) very easy to use with some extra features as to stream your movie to your friends if they are on the same network.
Synergy - http://synergy2.sourceforge.net/
If you have 2 pcs or more you can just use 1 keyboard and mouse to control both systems. I have my desktop and my laptop in the office and I use my normal keyboard for both, it shares memory so copy paste can be copy and no more having several mouse laying around not knowing which one to use and occupying all your desktop space.
Foxit pdf reader - http://www.foxitsoftware.com/pdf/rd_intro.php
This is not a must but aren't you tired of downloading 70MB to read a 30K pdf!!. This is a PDF reader free to use, there is a pay option for a writer but I don't need it yet. One day Adobe would need to launch a light version of their app that consumes less memory also.
Other applications I sue are the CoolEdit, RealVNC (or any vnc clon), WinSPC3 and ActivePorts.
Ok that is my list for the time being, I would have to go through my start/programs menu to find out more but if I have to find them then they are not essential.
Good luck!!
Sunday, June 24, 2007
Benjamin Franklin's Thirteen Virtues
One of the things I would like to take from Benjamin Franklin are the virtudes that he tried to follow. I have a lot of work to do on most of them, but it simpler now that I have identify them.
1. TEMPERANCE. Eat not to dullness; drink not to elevation.
2. SILENCE. Speak not but what may benefit others or yourself; avoid trifling conversation.
3. ORDER. Let all your things have their places; let each part of your business have its time.
4. RESOLUTION. Resolve to perform what you ought; perform without fail what you resolve.
5. FRUGALITY. Make no expense but to do good to others or yourself; i.e., waste nothing.
6. INDUSTRY. Lose no time; be always employ'd in something useful; cut off all unnecessary actions.
7. SINCERITY. Use no hurtful deceit; think innocently and justly, and, if you speak, speak accordingly.
8. JUSTICE. Wrong none by doing injuries, or omitting the benefits that are your duty.
9. MODERATION. Avoid extreams; forbear resenting injuries so much as you think they deserve.
10. CLEANLINESS. Tolerate no uncleanliness in body, cloaths, or habitation.
11.TRANQUILLITY. Be not disturbed at trifles, or at accidents common or unavoidable.
12. CHASTITY. Rarely use venery but for health or offspring, never to dulness, weakness, or the injury of your own or another's peace or reputation.
13. HUMILITY. Imitate Jesus and Socrates.
(is there something wrong that I liked the virtudes of somebody who lived +200 years ago when slavery was still in practice?... also if you think about it, the world lives by 10 rules that were given to us +2000 and other +6000 and even longer)
Book - Benjamin Franklin An American Life

I read Walter Isaacson book about Benjamin Franklin - note I am not american and english is not my first language! - and I have to say that I like it.
I am not a writer, critic and I am consider myself a normal human being with my own mind. I think the book was more about Benjamin Franklin on the american revolution (then the "An American Life" of the title makes sense) that a biography of this really interesting man. You can argue that this life was america and I agree on that. Everybody has the right to his own opinion right?
I recommend this book to everybody and one can lear a lot from it (or at least a few things depending on how commited and inteligent you are, in my case.. I just learned a little). As said the book focused more on Franklin's part on the American Independence, how from a loyal royalist became a patriot and help the US to get it idependence. (In my opinion a change more induced by the "practicallity of it" that the book mentioned he always focus on rather on actually believing it).
You can also learn about his family and scientific work, how he thought, worked and specially wrote. It is amazing how good (always in a practical way) he was writting and how much he wrote, ok no every idiot (: has his own blog but for back then this man really knew how to express ideas, how to influence people and how to tell the truth.
I didn't like how John Adams, Thomas Jefferson and Washington were portrayed (does that word exists?) and I didn't share Franklin's view about family.
In general I admire the guy, would buy him a beer as the book say but would not spend my christmas with him as I like to be with my family.
Funny thing at the same time I read this book I saw the movie called the "Shooter" (ok a blockbuster type of movie full of explosions with a die hard type of hero) and on it near the end the poor underdog hero confronts a US "sitting" senator about his actions and this says: "There are no sides.... there are republican and democrats there are haves and haves not... This is a country where a secretary of defense can go on tv and tell the american public that this is about freedom is not about oil" so ok, this is a movie but how far is from the true?
Again read this book or any other biography of Franklin, after this I am looking forward to read about Washington and Edison.
Testing Google Docs!
This is a test of google docs direct posting to blogger. It is an nice alternative to the blogpost post manager and google is full of utils to make your net experience more control by them!
So at this moment I am using.

Blogspot... where I publish (not very often) what I do (that means I need to do more).
Must have? Not really, you can use other servers.

Docs. Will become a must very shortly. Word and Excel like formats available on the web? No more loosing files due hard disk failures? No more forgetting the file at home? Sharing it with a team? Great features, a little concern about security (you would not put your company salary here yet) and would like to see a feature like automatic archive (imagine go back to all previous version of the same file).

Picasa. Having see how useful this is. Now you can have a blog and a flog?. I used to have Flirck (just testing on one of my first posts) but was limited on the amount of files per month or size. Let's see if this gives me the freedon (and remains FREE) to upload more files to share with family and friends.

Talk. Ok another hotmail messenger, yahoo messenger, icq, skype client kind of thing and I get lost between them. (I am using skype to test vxml, google talk never, hotmail messenger friends, yahoo meseenger work, icq I lost my account long time ago).
Must have? Not really Keep using your old clients and skype if you want to talk on voip

Calendar. A nice calendar to have on the web, maybe it can be connected to Orkut.
Must have? Yes if you want to get out of outlook calendar. Yahoo has another one but don't use it so much.

Desktop. This is a client install for search on my hd and add some gadgets (calendar) on my desktop (that looks a lot as Windows Vista gadgets.. the previous version had a white background).
Must have? Yes. Looking for files or emails is easier and faster.
 Toolbar. Nice to have, just add features to your IE or Firefox.

Gmail. Once you create an account you can activate everything so not used atm but nice. Note that people used to pay for having one of the invitations to gmail when it was still on beta. The 1GB (or more) that provides is great but how many accounts does a person really needs. I wish they could all have pop3 like in the old days.
And that is not all, if you go to the google homepage and choose "more" (on the search bar) you have more things to install. I use a lot maps and images and remember that now google have youtube database of vidoes.
So at this moment I am using.

Blogspot... where I publish (not very often) what I do (that means I need to do more).
Must have? Not really, you can use other servers.

Docs. Will become a must very shortly. Word and Excel like formats available on the web? No more loosing files due hard disk failures? No more forgetting the file at home? Sharing it with a team? Great features, a little concern about security (you would not put your company salary here yet) and would like to see a feature like automatic archive (imagine go back to all previous version of the same file).

Picasa. Having see how useful this is. Now you can have a blog and a flog?. I used to have Flirck (just testing on one of my first posts) but was limited on the amount of files per month or size. Let's see if this gives me the freedon (and remains FREE) to upload more files to share with family and friends.

Talk. Ok another hotmail messenger, yahoo messenger, icq, skype client kind of thing and I get lost between them. (I am using skype to test vxml, google talk never, hotmail messenger friends, yahoo meseenger work, icq I lost my account long time ago).
Must have? Not really Keep using your old clients and skype if you want to talk on voip

Calendar. A nice calendar to have on the web, maybe it can be connected to Orkut.
Must have? Yes if you want to get out of outlook calendar. Yahoo has another one but don't use it so much.

Desktop. This is a client install for search on my hd and add some gadgets (calendar) on my desktop (that looks a lot as Windows Vista gadgets.. the previous version had a white background).
Must have? Yes. Looking for files or emails is easier and faster.
 Toolbar. Nice to have, just add features to your IE or Firefox.
Gmail. Once you create an account you can activate everything so not used atm but nice. Note that people used to pay for having one of the invitations to gmail when it was still on beta. The 1GB (or more) that provides is great but how many accounts does a person really needs. I wish they could all have pop3 like in the old days.
And that is not all, if you go to the google homepage and choose "more" (on the search bar) you have more things to install. I use a lot maps and images and remember that now google have youtube database of vidoes.
Wednesday, February 28, 2007
Little Java program
My first little java program... after a few tries with the Hello World and reading a book I did my beeting game. It is not a great thing but I need to get used to break problems in parts - the example below doesn't do 100% that.
I need to be able to break each action as much as possible, at the begining I thought it was going to be easy but for this simple example I kept falling into creating one big procedural class. I should be able to break it even more and caught more exception (like entering chars/strings instead of numbers) and will do it after I finish the second book of begining java.
import java.text.NumberFormat;
public class Account {
static int balance;
public Account (int amount) {
balance = amount;
}
public Account () {
balance = 0;
}
public void credit (int betamount){
balance = balance + (2 * betamount);
}
public void debit (int betamount){
balance = balance - betamount;
}
public boolean checkBet (int betamount){
if (betamount > balance) {
return false;
} else {
return true;
}
}
public void showbalance (){
NumberFormat nf = NumberFormat.getCurrencyInstance();
System.out.println("Available balance is : " + nf.format(balance));
}
}
Main class
import java.util.Random;
import java.util.Scanner;
public class BettingGame {
static Random myRandom = new Random();
static Scanner myScanner = new Scanner(System.in);
public static void main(String[] args) {
Account myAccount = new Account(1000);
int available;
myAccount.showbalance();
boolean keepgoiang = true;
do {
System.out.println ("How much will you bet?");
if (!myScanner.hasNextInt()){
myScanner.next();
continue;
}
int bet = myScanner.nextInt();
if (bet == 0) {
break;
}
if (myAccount.checkBet(bet)){
do {
System.out.println ("Which number do you chose");
if (myScanner.hasNextInt()){
break;
}
}while (!myScanner.hasNextInt());
int number = myScanner.nextInt();
int ra nnum = RandomGenerator(0,10);
System.out.println("Lucky number is: " + rannum);
if (number == rannum){
System.out.print("You win. ");
myAccount.credit(bet);
} else {
System.out.print("Better Luck next time. ");
myAccount.debit(bet);
}
} else {
System.out.println ("Not enough founds for that bet");
}
myAccount.showbalance();
if (Account.balance == 0) {
keepgoing = false;
}
}while (keepgoing);
if (myAccount.balance > 0 ) {
System.out.println("Great you quit with money on your pocket");
myAccount.showbalance();
} else {
System.out.println("You are fucked!");
myAccount.showbalance();
}
}
public static int RandomGenerator (int min, int max){
int RamNumber = myRandom.nextInt(10) + 1;
return RamNumber;
}
}
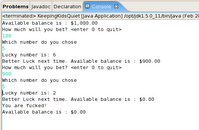
An image of the output on the console:
I need to be able to break each action as much as possible, at the begining I thought it was going to be easy but for this simple example I kept falling into creating one big procedural class. I should be able to break it even more and caught more exception (like entering chars/strings instead of numbers) and will do it after I finish the second book of begining java.
import java.text.NumberFormat;
public class Account {
static int balance;
public Account (int amount) {
balance = amount;
}
public Account () {
balance = 0;
}
public void credit (int betamount){
balance = balance + (2 * betamount);
}
public void debit (int betamount){
balance = balance - betamount;
}
public boolean checkBet (int betamount){
if (betamount > balance) {
return false;
} else {
return true;
}
}
public void showbalance (){
NumberFormat nf = NumberFormat.getCurrencyInstance();
System.out.println("Available balance is : " + nf.format(balance));
}
}
Main class
import java.util.Random;
import java.util.Scanner;
public class BettingGame {
static Random myRandom = new Random();
static Scanner myScanner = new Scanner(System.in);
public static void main(String[] args) {
Account myAccount = new Account(1000);
int available;
myAccount.showbalance();
boolean keepgoiang = true;
do {
System.out.println ("How much will you bet?
if (!myScanner.hasNextInt()){
myScanner.next();
continue;
}
int bet = myScanner.nextInt();
if (bet == 0) {
break;
}
if
do {
System.out.println ("Which number do you chose");
if (myScanner.hasNextInt()){
break;
}
}while (!myScanner.hasNextInt());
int number = myScanner.nextInt();
int ra
System.out.println("Lucky number is: " + rannum);
if (number == rannum){
System.out.print("You win. ");
myAccount.credit(bet);
} else {
System.out.print("Better Luck next time. ");
myAccount.debit(bet);
}
} else {
System.out.println ("Not enough founds for that bet");
}
myAccount.showbalance();
if (Account.balance == 0) {
keepgoing = false;
}
if (myAccount.balance > 0 ) {
System.out.println("Great you quit with money on your pocket");
myAccount.showbalance();
} else {
System.out.println("You are fucked!");
myAccount.showbalance();
}
public static int RandomGenerator (int min, int max){
int RamNumber = myRandom.nextInt(10) + 1;
return RamNumber;
}
}
An image of the output on the console:
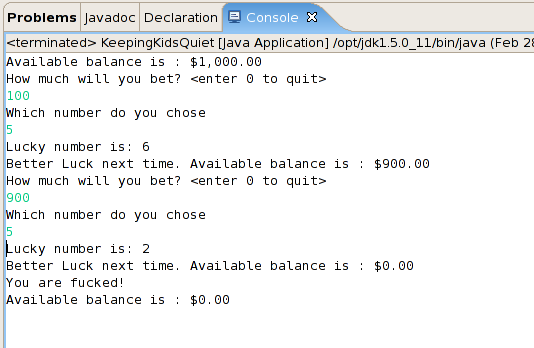
Monday, February 12, 2007
Fedora Eclipse 3.2.0 and jdk-1_5_0
I am leraning Java (trying to at least) and during the installation I was very pleased to see the Eclipse package under the options but the version installed uses jre-1.4.2-gcj. That is the java runtime engine from the gnu project. It is a great effort but to someone who is reading books about java and the Sun version you get to cases where particular clases/packages (I still don't get hold of the names) are not available. Therefore I installed the Sun JDK.
As always after googling a little I found a great how-to and here are my notes. The link to the original post is at the botton of this post.
First download a jdk/jre from Sun. At the moment of writing this version 6 was available. At work I using a tool to create vxml code with eclipse that recommends 1.4.2 so I choose 1.5 (just in the middle).
I downloaded jdk-1_5_0_11-linux-i586.bin. There is a rpm but every site I checked recommends not getting closed to the sun rpm and all prefers to just run the binary.
Once downloaed copy it to /opt directory and give it rights to be executed. The easiest way is chmod +x filename.
Next cd to /opt and just run the binnary.
./jdk-1_5_0_11-linux-i586.bin
This will install everything under the current directory. In my case I ended with /opt/jdk1.5.0_11
Note that the JDK installed Sun JRE so you might want to use this jre instead that the gnu one when browsing the web. So to do this you just create a link on the mozilla
ln -s /opt/jdk1.5.0_11/jre/plugin/i386/ns7/libjavaplugin_oji.so /usr/lib/mozilla/plugins/libjavaplugin_oji.so
If you use firefox don't worry as firefox checks the mozilla plugins.
Now we start with the tricky part. You need to create a file java.sh to include the new paths, in my case I created the following:
[ricardo@mybox]$ more /etc/profile.d/java.sh
export J2RE_HOME=/opt/jdk1.5.0_11/jre
export PATH=$J2RE_HOME/bin:$PATH
[ricardo@mybox]
Once you have this file execute it by typing:
source /etc/profile.d/java.sh
This wll set your new java paths. To check it run the command below:
[ricardo@mybox]$ which java
/opt/jdk1.5.0_11/jre/bin/java
[ricardo@mybox]$
Next step is to run the following command to be able to later change the from gnu java to sun java.
/usr/sbin/alternatives --install /usr/bin/java java /opt/jdk1.5.0_11/jre/bin/java 2
Then type
/usr/sbin/alternatives --config java
This will show you something like this:
[ricardo@mybox]$ /usr/sbin/alternatives --config java
There are 2 programs which provide 'java'.
Selection Command
-----------------------------------------------
* 1 /usr/lib/jvm/jre-1.4.2-gcj/bin/java
+ 2 /opt/jdk1.5.0_11/jre/bin/java
Enter to keep the current selection[+], or type selection number:
In the case above the + sign was on option 1. I selected 2 so it changed to the new version I installed.
Final step is to run the command below and get a similar entry as mine.
[ricardo@mybox]$ /usr/sbin/alternatives --display java
java - status is manual.
link currently points to /opt/jdk1.5.0_11/jre/bin/java
/usr/lib/jvm/jre-1.4.2-gcj/bin/java - priority 1420
slave keytool: /usr/lib/jvm/jre-1.4.2-gcj/bin/keytool
slave rmiregistry: /usr/lib/jvm/jre-1.4.2-gcj/bin/rmiregistry
slave jre_exports: /usr/lib/jvm-exports/jre-1.4.2-gcj
slave jre: /usr/lib/jvm/jre-1.4.2-gcj
/opt/jdk1.5.0_11/jre/bin/java - priority 2
slave keytool: (null)
slave rmiregistry: (null)
slave jre_exports: (null)
slave jre: (null)
Current `best' version is /usr/lib/jvm/jre-1.4.2-gcj/bin/java.
Now Eclipse. Eclipse keep using the old runtime everytime you create a new project.
To solve this when you create a project go to the JRE section and click on "Configure JREs" as shown on the image below.
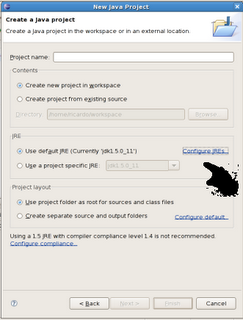
Then on the following screen you click on add and complete the form with the details shown below (note that the libraries section will be auto completed once you selcted the home directory).
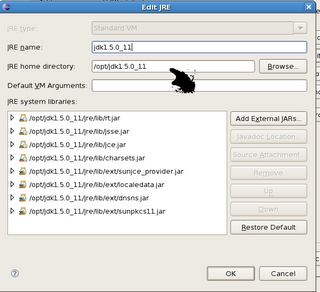
The final step is to check the new JRE and every new project will be using the Sun engine.
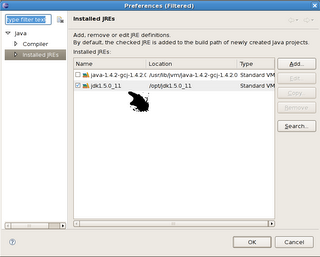
That is all, Good luck!
Much more information on the link below:
http://stanton-finley.net/fedora_core_5_installation_notes.html#Java
Sunday, February 11, 2007
Install Fedora Core 6 on a Dell Latitude D620
I got a new laptop at work (the hp nx6125 decided to give up on me) and as every time I have a new pc/laptop I will try to run linux on it until -as always- remember that I am a windows sofa lazy user and go back to it. Therefore until my concious realizes that I am trying to learn something here are the notes on what I did. (note if you want notes on how to install windows just click next during installation until death knocks on your door).
I use two flavours of Linux.. Fedora for personal use and Debian for Servers.. Why? No idea.
Note that his are my notes.. the urls where I got all this from are below. This notes are for me to avoid googling again for this in the future.
*****Installation
Downloaded the hp dvd image and booted from the DVD and just hit enter. I found later notes of people recommending the following boot options:
linux i686
--- Check http://fedoraproject.org/wiki/Bugs/FC6Common. Seems that some early versions installed the wrong architecture kernel version (in the document i586 instead of i686).
linux resolution=1440×900
--- For some reason some use this kind of resolution. I haven't tried it yet but not sure if this is for the nvidia or intel board.
The installation is straight forward and I surf around the packages and selected the ones I wanted. Note that after the installation Fedora will try to update all your applications, if you select Extras as package sources this update process will take a bit longer so have a good book or movie ready while your system goes to the net and updates everything (including kernel).
The hardware on my pc is:
[root@box loginname]$ /sbin/lspci
00:00.0 Host bridge: Intel Corporation Mobile 945GM/PM/GMS/940GML and 945GT Express Memory Controller Hub (rev 03)
00:02.0 VGA compatible controller: Intel Corporation Mobile 945GM/GMS/940GML Express Integrated Graphics Controller (rev 03)
00:02.1 Display controller: Intel Corporation Mobile 945GM/GMS/940GML Express Integrated Graphics Controller (rev 03)
00:1b.0 Audio device: Intel Corporation 82801G (ICH7 Family) High Definition Audio Controller (rev 01)
00:1c.0 PCI bridge: Intel Corporation 82801G (ICH7 Family) PCI Express Port 1 (rev 01)
00:1c.1 PCI bridge: Intel Corporation 82801G (ICH7 Family) PCI Express Port 2 (rev 01)
00:1c.2 PCI bridge: Intel Corporation 82801G (ICH7 Family) PCI Express Port 3 (rev 01)
00:1d.0 USB Controller: Intel Corporation 82801G (ICH7 Family) USB UHCI #1 (rev 01)
00:1d.1 USB Controller: Intel Corporation 82801G (ICH7 Family) USB UHCI #2 (rev 01)
00:1d.2 USB Controller: Intel Corporation 82801G (ICH7 Family) USB UHCI #3 (rev 01)
00:1d.3 USB Controller: Intel Corporation 82801G (ICH7 Family) USB UHCI #4 (rev 01)
00:1d.7 USB Controller: Intel Corporation 82801G (ICH7 Family) USB2 EHCI Controller (rev 01)
00:1e.0 PCI bridge: Intel Corporation 82801 Mobile PCI Bridge (rev e1)
00:1f.0 ISA bridge: Intel Corporation 82801GBM (ICH7-M) LPC Interface Bridge (rev 01)
00:1f.2 IDE interface: Intel Corporation 82801GBM/GHM (ICH7 Family) Serial ATA Storage Controller IDE (rev 01)
00:1f.3 SMBus: Intel Corporation 82801G (ICH7 Family) SMBus Controller (rev 01)
03:01.0 CardBus bridge: O2 Micro, Inc. OZ601/6912/711E0 CardBus/SmartCardBus Controller (rev 40)
09:00.0 Ethernet controller: Broadcom Corporation NetXtreme BCM5752 Gigabit Ethernet PCI Express (rev 02)
0c:00.0 Network controller: Intel Corporation PRO/Wireless 3945ABG Network Connection (rev 02)
From here the only things that I had to work around were:
00:02.1 Display controller: Intel Corporation Mobile 945GM/GMS/940GML Express Integrated Graphics Controller (rev 03)
0c:00.0 Network controller: Intel Corporation PRO/Wireless 3945ABG Network Connection (rev 02)
I will add the details for this below on the document.
*****Sudo
Sudo helps normal accounts to run application as root without being root. To add the normal user account as root run the command visudo and enter the following line.
loginname ALL=(ALL) ALL
The sudo configuration is pretty easy and straight forward. You can also create different groups to give access to diferent things like files or applications. In the above case would have access to everything and it will need to type it's own password everytime that sudos a command.
*****Yum
Yum is the apt-get of Fedora and the life saver of the novice that would take care of dependencies and file location when isntalling/updating/removing new software. I remember on '96 or '97 playing with Slackware (influenced by Antonio Ex@@@) and FreeBSD (influenced by Juan Carlos Ne@@@@@) and untaring files and running the make, make config, make install to find out that a file somewhere was not present or your gcc was not the correct one, etc. And yes if you do the manth that was more than 10 years ago and still don't know shit. One day If I get rich and don't need to work anymore I will spend time to learn Slackware (imho the best way to learn what happens under the hood).
I added freshrpm to the repository
[root@box loginname]cd /etc/yum.repos.d/
[root@box loginname]# more freshrpms.repo
[freeshrpms]
name=FreshRPMs for Fedora Core $releasever - $basearch
baseurl=http://ayo.freshrpms.net/fedora/linux/$releasever/$basearch/freshrpms
enabled=1
gpgcheck=1
gpgkey=http://freshrpms.net/RPM-GPG-KEY-freshrpms
*****Fedora Kernel Headers
We will need the kernel headers at some point (wireless) and always a pain in the ass but I follow this steps found on the web and it worked.
Note this is a 99% copy of a page I found with my notes around. The original link is below (sorry for this guys!).
First move to:
cd /usr/src/redhat/
We need to download the kernel SRPM package, whose version and release match our currently running kernel. This version is shown by the following command:
# uname -r
2.6.19-1.2895.fc6
I use the following link wget http://download.fedora.redhat.com/pub/fedora/linux/core/updates/6/SRPMS/kernel-2.6.19-1.2895.fc6.src.rpm
Next thing is to install the SRPM package. This just extracts the included files in the proper directories under /usr/src/redhat/ or to the directory tree you use for building. It does not actually install any kernels. As a user, run:.
# rpm -ivh kernel-$(uname -r).src.rpm
This extracts the kernel source packages and the various patches in the SOURCES directory and the spec file in the SPECS directory. The SRC RPM file is not needed any more.
Next, we execute the %prep stage of the spec file, by issuing the following command:
# rpmbuild -bp --target $(arch) --rmsource --rmspec SPECS/kernel-2.6.spec
This extracts the kernel source code package and applies all the Red Hat patches. All the files are placed in the BUILD directory. Here follows an explanation of the options:
-bp : Execute only the %prep stage
–target : Specify the architecture. You can explicitly put your architecture, instead of the $(arch) in this option. This is the same thing.
–rmsource : This removes all the kernel SRC RPM related files under the SOURCES directory, so no unneeded files are left to the system.
–rmspec : This also removes the spec file from the SPECS directory.
Now, we move to the directory containing the fedora kernel sources:
# cd /usr/src/redhat/BUILD/kernel-2.6.19/linux-2.6.19.i686
Copy the proper kernel configuration file, that matches your architecture, from the configs directory and place it in our current working directory, naming it as .config and replacing the already existent .config file. For example, I used the kernel-2.6.14-i686.config file :
# cp configs/kernel-2.6.19-i586.config .config
These files most probably contain the same configuration options, but we do this for completeness.
Next thing is to add the proper kernel release number to the Makefile (in directory: BUILD/kernel-2.6.19/linux-2.6.19.i686/). As it is stated in the Fedora release notes, in order to "protect the innocent" the value of the EXTRAVERSION field is -prep. Open this Makefile in a text editor and replace the -prep with the release number of your currently running kernel. For example, my running kernel at the time of writing is 2.6.14-1.1637_FC4. I replace the:
EXTRAVERSION = -prep
with :
EXTRAVERSION = -1.2895.fc6
Example:
# vi /usr/src/redhat/BUILD/kernel-2.6.19/linux-2.6.19.i686/Makefile
VERSION = 2
PATCHLEVEL = 6
SUBLEVEL = 19
EXTRAVERSION = -1.2895.fc6
NAME=Avast! A bilge rat!
The last action of the basic configuration is to run the following command:
# make oldconfig
This command sets the default answers to all kernel configuration questions according to the settings of our .config file. This command is more relevant to kernel re-building, but won’t hurt issuing it.
At this point, if you try to compile any third party kernel modules using this directory as the kernel source directory, you will most probably encounter errors. This is because some more preparation should be done to the kernel sources (this mainly involves the include directory).
A full compilation of the kernel would set all these things straight, but one of the goals is to avoid the compilation of the kernel to save some time. We have not modified any of the kernel configuration options or applied any extra patches, so this would be pointless anyway.
I remind that our current directory is:
/usr/src/redhat/BUILD/kernel-2.6.19/linux-2.6.19.i686
A file, named Module.symvers, which contains information about the native kernel modules, needs to be present inside our current directory. This file is normally created after the native kernel modules are compiled. Since we are not building the kernel or any modules and since we have not modified the default kernel configuration, we can use the Module.symvers file, which is included in the official fedora kernel-devel RPM.
The presense of this file is important when we compile any third party modules using these kernel headers. If it’s not there, then our modules will not contain any dependency information, regarding the native kernel modules. This way, if the third party module depends on some native kernel modules, then you will have to load the latter manually.
So, copy the Module.symvers file from the directory, where the official fedora kernel-devel package is installed, into our current directory:
# cp /usr/src/kernels/$(uname -r)-$(arch)/Module.symvers .
Finally, we issue the following command:
# make prepare scripts
This creates:
This is the proper and most complete way of preparing our headers, instead of compiling each of the files mentioned above individually.
That should be the end of all the needed actions in order to accomplish our goal. Final Words: At this point, we have a custom directory that contains:
*****Wireless Intel Corporation PRO/Wireless 3945ABG
My wireless is a Intel. I don't recall exactly what I did as I surf a lot but here is what I remember:
0c:00.0 Network controller: Intel Corporation PRO/Wireless 3945ABG Network Connection (rev 02)
a) Install dkms-ipw3945, ipw3945d and ipw3945-firmware from freshrpms, install the kernel-devel package for your kernel (already done) and reboot.
yum install ipw3945 (not sure)
yum install dkms-ipw3945-1.2.0-1.noarch.rpm
yum install ipw3945-firmware-1.13-1.noarch.rpm
yum install ipw3945d-1.7.22-4.i386.rpm
b) Add the NetworkManager to Gnome so I can geet a fancy icon to log into networks.
This was really easy. Install PPTP and the pptpconfig GUI using the following commands:
# rpm -Uvh http://pptpclient.sourceforge.net/yum/stable/fc6/pptp-release-current.noarch.rpm
# yum --enablerepo=pptp-stable install pptpconfig
Then open ppptconfig application from the Applications/Internet menu and complete the configuration. On my case I had to disable (or enable?) one of the Encryption options to be able to connect to my work. Also on the Routing tab you can either select to route all traffic through the tunnel or set up rules so your internet traffic goes through your home broadband and your corporate applications go through the tunnel (don't know if this is a good idea on a security point of view).
*****NTFS
Mounting NTFS partition on FC6
My laptop has 2 windows partions, one for the windows applications/windows installation and a second one to keep files, documents, etc. This is to avoid any problem in case I need to reinstall windows and to use as sandbox with the Fedora partition.
My steps were:
a) As root (or sudo)
yum install fuse fuse-libs ntfs-3g ntfsprogs ntfsprogs-gnomevfs
b) Check disk configuration to see where the partition is:
[root@box loginname]# /sbin/fdisk -l
Disk /dev/sda: 60.0 GB, 60011642880 bytes
255 heads, 63 sectors/track, 7296 cylinders
Units = cylinders of 16065 * 512 = 8225280 bytes
Device Boot Start End Blocks Id System
/dev/sda1 * 1 1958 15727603+ 7 HPFS/NTFS
/dev/sda2 1959 5222 26218080 7 HPFS/NTFS
/dev/sda3 5223 5235 104422+ 83 Linux
/dev/sda4 5236 7296 16554982+ 5 Extended
/dev/sda5 5236 7296 16554951 8e Linux LVM
The partition I want to mount is /dev/sda2, so I change the /etc/fstab and add the last line on the example below:
[root@box loginname]$ more /etc/fstab
/dev/VolGroup00/LogVol00 / ext3 defaults 1 1
LABEL=/boot /boot ext3 defaults 1 2
devpts /dev/pts devpts gid=5,mode=620 0 0
tmpfs /dev/shm tmpfs defaults 0 0
proc /proc proc defaults 0 0
sysfs /sys sysfs defaults 0 0
/dev/VolGroup00/LogVol01 swap swap defaults 0 0
/dev/sda2 /mnt/drive_e ntfs-3g rw,defaults,umask=0000 0 0
Where /mnt/drive_e is a directory I created to "label" the mounting point.
Then ntfs-3g is the file system and note that rw will make the partition read/write. You can also set it up as ro (read only). Check the man mount for the meaning of umask as it gives several options.
*****Screen Resolution Intel 945 Dell 620
Surfing around I found that many of this dells come with a nvidia driver and I guess my company is a cheaper one and went for the Intel 945 option.
The lspci shows the version of the Display controller
00:02.1 Display controller: Intel Corporation Mobile 945GM/GMS/940GML Express Integrated Graphics Controller (rev 03)
Installation went well but the system keeps booting on 1024x768. I read along and I can see that I can at least run this laptip at 1200x800 and in some cases at 1440x900. Haven't been able to run at 1440x900 but here is what I did for 1280x800.
a) yum install 915resolution
It looks that you need this utility to run customs resolution on the 945. Also this utility needs to be run everytime that you boot your pc.
A few tips, after installing run "locate 915resolution" if nothing is found then run an updatedb.
After install run a 915resolution -l and you will get a list of all options. Probably 1280x800 is not there so run the following options to create the 1280x800
/usr/sbin/915resolution 49 1280 800
/usr/sbin/915resolution 38 1280 800
/usr/sbin/915resolution 58 1280 800
As you have to run this everytime the box boots you can add them on the /etc/rc.local.
I also added the file /etc/default/915resolution so that it has XRESO=1280 YRESO=800.
Finally I changed the /etc/X11/xorg.conf as follows (note that everytime I change the display configuration using the gnome utility this file looses this changes - I was trying to have 2 montiros running) but along the above steps are done it doesn't seem to affect it. Just in case below are the details I originally used on xorg.conf.
Section "Monitor"
Identifier "Monitor1"
VendorName "Monitor Vendor"
ModelName "Monitor 1024x768"
HorizSync 24.0 - 64.0
VertRefresh 43.0 - 60.0
Option "dpms"
EndSection
Section "Device"
Identifier "Videocard0"
Driver "i810"
BusID "PCI:0:2:0"
EndSection
Section "Screen"
Identifier "Screen0"
Device "Videocard0"
DefaultDepth 24
SubSection "Display"
Viewport 0 0
Depth 24
Modes "1440x900" "1280x800" "1024x768" "800x600" "640x480"
EndSubSection
EndSection
*****FIX DVD DMA
(again copied from another site) For some of us, DMA isn't enabled by default for our wonderful FC5 powered computers (like some Dells and Thinkpads). I've been spending a month or two (off and on) trying to find out how to work arround this problem. The long answer, from what I understand, for why this happens has to do with an IDE and a SATA/PATA drivers that are conflicting with one another and trying to control the drive (you might notice that the drive is labled /dev/hdc) and the DMA doesn't work well... or at all. According to the bug-report that I read, this is not a bug but an expected side effect of some DVD drive setups. With recently released kernels it is not required to make a custom-build, so this is done based off of a yum-installed kernel.
Signs of this problem include choppy DVD playback or slow image reading and when running "hdparm -d1 /dev/hdc" to turn DMA on it will respond with "Operation not permitted". If you see this and, like me, have been trying to find a way to enable DMA on your drive this should help you and I'm writing this so that people with this (apperently common) problem can referance one place to solve it.
Ok, now to get to the part where I tell you how to...
In the terminal:
$su -
#gedit /etc/modprobe.conf
add the following line to the end of the file (leaving an extra empty line behind it):
options libata atapi_enabled=1
save, close and continue in the terminal:
#gedit /boot/grub/menu.lst
add the following to the boot parameter:
combined_mode=libata
save, close and reboot.
Now your DVD drive should be called "/dev/scd0", DMA will not be needed and Xine should be able to play it without the choppyness. Further effects of a working DVD drive (from what I hear, tell myself to make me feel better and dream) include faster CD ripping speeds and general read speeds, improved oooo-aaahhhh factor of showing off Linux, improved firtility and a marginal decrease in Windows dependancy...
*****Other installations
yum install flash-plugin
yum install wifi-radar
yum install wlassistant
yum install gnome-commander
*****Usefull URLs
Below are the URLs I used to get the information. Read them as the people who wrote them knew what they were doing that is not my case most of the time.
http://pptpclient.sourceforge.net/howto-fedora-core-6.phtml
http://www.g-loaded.eu/2005/12/14/the-complete-fedora-kernel-headers/
http://klamstwo.org/evad/archives/3
http://mikelococo.com/2007/01/fc6-on-d620/
http://www.mjmwired.net/resources/mjm-fedora-fc6.html
http://www.linuxquestions.org/questions/showthread.php?t=515648
http://fedoraproject.org/wiki/Tools/NetworkManager#head-fc3fe44e92c63867615113b1ef69cf4fc0dc03cf
http://www.fedoraforum.org/forum/showthread.php?t=114586
C51B50E96BD6109DF982BBD4F6
I use two flavours of Linux.. Fedora for personal use and Debian for Servers.. Why? No idea.
Note that his are my notes.. the urls where I got all this from are below. This notes are for me to avoid googling again for this in the future.
*****Installation
Downloaded the hp dvd image and booted from the DVD and just hit enter. I found later notes of people recommending the following boot options:
linux i686
--- Check http://fedoraproject.org/wiki/Bugs/FC6Common. Seems that some early versions installed the wrong architecture kernel version (in the document i586 instead of i686).
linux resolution=1440×900
--- For some reason some use this kind of resolution. I haven't tried it yet but not sure if this is for the nvidia or intel board.
The installation is straight forward and I surf around the packages and selected the ones I wanted. Note that after the installation Fedora will try to update all your applications, if you select Extras as package sources this update process will take a bit longer so have a good book or movie ready while your system goes to the net and updates everything (including kernel).
The hardware on my pc is:
[root@box loginname]$ /sbin/lspci
00:00.0 Host bridge: Intel Corporation Mobile 945GM/PM/GMS/940GML and 945GT Express Memory Controller Hub (rev 03)
00:02.0 VGA compatible controller: Intel Corporation Mobile 945GM/GMS/940GML Express Integrated Graphics Controller (rev 03)
00:02.1 Display controller: Intel Corporation Mobile 945GM/GMS/940GML Express Integrated Graphics Controller (rev 03)
00:1b.0 Audio device: Intel Corporation 82801G (ICH7 Family) High Definition Audio Controller (rev 01)
00:1c.0 PCI bridge: Intel Corporation 82801G (ICH7 Family) PCI Express Port 1 (rev 01)
00:1c.1 PCI bridge: Intel Corporation 82801G (ICH7 Family) PCI Express Port 2 (rev 01)
00:1c.2 PCI bridge: Intel Corporation 82801G (ICH7 Family) PCI Express Port 3 (rev 01)
00:1d.0 USB Controller: Intel Corporation 82801G (ICH7 Family) USB UHCI #1 (rev 01)
00:1d.1 USB Controller: Intel Corporation 82801G (ICH7 Family) USB UHCI #2 (rev 01)
00:1d.2 USB Controller: Intel Corporation 82801G (ICH7 Family) USB UHCI #3 (rev 01)
00:1d.3 USB Controller: Intel Corporation 82801G (ICH7 Family) USB UHCI #4 (rev 01)
00:1d.7 USB Controller: Intel Corporation 82801G (ICH7 Family) USB2 EHCI Controller (rev 01)
00:1e.0 PCI bridge: Intel Corporation 82801 Mobile PCI Bridge (rev e1)
00:1f.0 ISA bridge: Intel Corporation 82801GBM (ICH7-M) LPC Interface Bridge (rev 01)
00:1f.2 IDE interface: Intel Corporation 82801GBM/GHM (ICH7 Family) Serial ATA Storage Controller IDE (rev 01)
00:1f.3 SMBus: Intel Corporation 82801G (ICH7 Family) SMBus Controller (rev 01)
03:01.0 CardBus bridge: O2 Micro, Inc. OZ601/6912/711E0 CardBus/SmartCardBus Controller (rev 40)
09:00.0 Ethernet controller: Broadcom Corporation NetXtreme BCM5752 Gigabit Ethernet PCI Express (rev 02)
0c:00.0 Network controller: Intel Corporation PRO/Wireless 3945ABG Network Connection (rev 02)
From here the only things that I had to work around were:
00:02.1 Display controller: Intel Corporation Mobile 945GM/GMS/940GML Express Integrated Graphics Controller (rev 03)
0c:00.0 Network controller: Intel Corporation PRO/Wireless 3945ABG Network Connection (rev 02)
I will add the details for this below on the document.
*****Sudo
Sudo helps normal accounts to run application as root without being root. To add the normal user account as root run the command visudo and enter the following line.
loginname ALL=(ALL) ALL
The sudo configuration is pretty easy and straight forward. You can also create different groups to give access to diferent things like files or applications. In the above case
*****Yum
Yum is the apt-get of Fedora and the life saver of the novice that would take care of dependencies and file location when isntalling/updating/removing new software. I remember on '96 or '97 playing with Slackware (influenced by Antonio Ex@@@) and FreeBSD (influenced by Juan Carlos Ne@@@@@) and untaring files and running the make, make config, make install to find out that a file somewhere was not present or your gcc was not the correct one, etc. And yes if you do the manth that was more than 10 years ago and still don't know shit. One day If I get rich and don't need to work anymore I will spend time to learn Slackware (imho the best way to learn what happens under the hood).
I added freshrpm to the repository
[root@box loginname]cd /etc/yum.repos.d/
[root@box loginname]# more freshrpms.repo
[freeshrpms]
name=FreshRPMs for Fedora Core $releasever - $basearch
baseurl=http://ayo.freshrpms.net/fedora/linux/$releasever/$basearch/freshrpms
enabled=1
gpgcheck=1
gpgkey=http://freshrpms.net/RPM-GPG-KEY-freshrpms
*****Fedora Kernel Headers
We will need the kernel headers at some point (wireless) and always a pain in the ass but I follow this steps found on the web and it worked.
Note this is a 99% copy of a page I found with my notes around. The original link is below (sorry for this guys!).
First move to:
cd /usr/src/redhat/
We need to download the kernel SRPM package, whose version and release match our currently running kernel. This version is shown by the following command:
# uname -r
2.6.19-1.2895.fc6
I use the following link wget http://download.fedora.redhat.com/pub/fedora/linux/core/updates/6/SRPMS/kernel-2.6.19-1.2895.fc6.src.rpm
Next thing is to install the SRPM package. This just extracts the included files in the proper directories under /usr/src/redhat/ or to the directory tree you use for building. It does not actually install any kernels. As a user, run:.
# rpm -ivh kernel-$(uname -r).src.rpm
This extracts the kernel source packages and the various patches in the SOURCES directory and the spec file in the SPECS directory. The SRC RPM file is not needed any more.
Next, we execute the %prep stage of the spec file, by issuing the following command:
# rpmbuild -bp --target $(arch) --rmsource --rmspec SPECS/kernel-2.6.spec
This extracts the kernel source code package and applies all the Red Hat patches. All the files are placed in the BUILD directory. Here follows an explanation of the options:
-bp : Execute only the %prep stage
–target : Specify the architecture. You can explicitly put your architecture, instead of the $(arch) in this option. This is the same thing.
–rmsource : This removes all the kernel SRC RPM related files under the SOURCES directory, so no unneeded files are left to the system.
–rmspec : This also removes the spec file from the SPECS directory.
Now, we move to the directory containing the fedora kernel sources:
# cd /usr/src/redhat/BUILD/kernel-2.6.19/linux-2.6.19.i686
Copy the proper kernel configuration file, that matches your architecture, from the configs directory and place it in our current working directory, naming it as .config and replacing the already existent .config file. For example, I used the kernel-2.6.14-i686.config file :
# cp configs/kernel-2.6.19-i586.config .config
These files most probably contain the same configuration options, but we do this for completeness.
Next thing is to add the proper kernel release number to the Makefile (in directory: BUILD/kernel-2.6.19/linux-2.6.19.i686/). As it is stated in the Fedora release notes, in order to "protect the innocent" the value of the EXTRAVERSION field is -prep. Open this Makefile in a text editor and replace the -prep with the release number of your currently running kernel. For example, my running kernel at the time of writing is 2.6.14-1.1637_FC4. I replace the:
EXTRAVERSION = -prep
with :
EXTRAVERSION = -1.2895.fc6
Example:
# vi /usr/src/redhat/BUILD/kernel-2.6.19/linux-2.6.19.i686/Makefile
VERSION = 2
PATCHLEVEL = 6
SUBLEVEL = 19
EXTRAVERSION = -1.2895.fc6
NAME=Avast! A bilge rat!
The last action of the basic configuration is to run the following command:
# make oldconfig
This command sets the default answers to all kernel configuration questions according to the settings of our .config file. This command is more relevant to kernel re-building, but won’t hurt issuing it.
At this point, if you try to compile any third party kernel modules using this directory as the kernel source directory, you will most probably encounter errors. This is because some more preparation should be done to the kernel sources (this mainly involves the include directory).
A full compilation of the kernel would set all these things straight, but one of the goals is to avoid the compilation of the kernel to save some time. We have not modified any of the kernel configuration options or applied any extra patches, so this would be pointless anyway.
I remind that our current directory is:
/usr/src/redhat/BUILD/kernel-2.6.19/linux-2.6.19.i686
A file, named Module.symvers, which contains information about the native kernel modules, needs to be present inside our current directory. This file is normally created after the native kernel modules are compiled. Since we are not building the kernel or any modules and since we have not modified the default kernel configuration, we can use the Module.symvers file, which is included in the official fedora kernel-devel RPM.
The presense of this file is important when we compile any third party modules using these kernel headers. If it’s not there, then our modules will not contain any dependency information, regarding the native kernel modules. This way, if the third party module depends on some native kernel modules, then you will have to load the latter manually.
So, copy the Module.symvers file from the directory, where the official fedora kernel-devel package is installed, into our current directory:
# cp /usr/src/kernels/$(uname -r)-$(arch)/Module.symvers .
Finally, we issue the following command:
# make prepare scripts
This creates:
- The include/linux/version.h file, which contains kernel versioning information.
- The proper asm symlink for your platform and the asm-offsets.h file inside your platform’s specific asm directory.
- The scripts that come with the kernel sources. These are needed when we compile third party modules using these headers.
This is the proper and most complete way of preparing our headers, instead of compiling each of the files mentioned above individually.
That should be the end of all the needed actions in order to accomplish our goal. Final Words: At this point, we have a custom directory that contains:
- The fedora kernel sources. The kernel has not been compiled.
- The kernel headers that match those of the kernel-devel RPM package with the difference that they are complete. No files are missing.
*****Wireless Intel Corporation PRO/Wireless 3945ABG
My wireless is a Intel. I don't recall exactly what I did as I surf a lot but here is what I remember:
0c:00.0 Network controller: Intel Corporation PRO/Wireless 3945ABG Network Connection (rev 02)
a) Install dkms-ipw3945, ipw3945d and ipw3945-firmware from freshrpms, install the kernel-devel package for your kernel (already done) and reboot.
yum install ipw3945 (not sure)
yum install dkms-ipw3945-1.2.0-1.noarch.rpm
yum install ipw3945-firmware-1.13-1.noarch.rpm
yum install ipw3945d-1.7.22-4.i386.rpm
b) Add the NetworkManager to Gnome so I can geet a fancy icon to log into networks.
- Install the software: su -c 'yum install NetworkManager NetworkManager-glib NetworkManager-gnome'
- Set the main service to start on boot: su -c '/sbin/chkconfig --level 345 NetworkManager on'
- Set the dispatcher service to start on boot: su -c '/sbin/chkconfig --level 345 NetworkManagerDispatcher on'
- Start the services: su -c '/sbin/service NetworkManager start ; /sbin/service NetworkManagerDispatcher start'
- Now enter this command to load the tray icon: NetworkManagerInfo & (or just Reboot as I did).
This was really easy. Install PPTP and the pptpconfig GUI using the following commands:
# rpm -Uvh http://pptpclient.sourceforge.net/yum/stable/fc6/pptp-release-current.noarch.rpm
# yum --enablerepo=pptp-stable install pptpconfig
Then open ppptconfig application from the Applications/Internet menu and complete the configuration. On my case I had to disable (or enable?) one of the Encryption options to be able to connect to my work. Also on the Routing tab you can either select to route all traffic through the tunnel or set up rules so your internet traffic goes through your home broadband and your corporate applications go through the tunnel (don't know if this is a good idea on a security point of view).
*****NTFS
Mounting NTFS partition on FC6
My laptop has 2 windows partions, one for the windows applications/windows installation and a second one to keep files, documents, etc. This is to avoid any problem in case I need to reinstall windows and to use as sandbox with the Fedora partition.
My steps were:
a) As root (or sudo)
yum install fuse fuse-libs ntfs-3g ntfsprogs ntfsprogs-gnomevfs
b) Check disk configuration to see where the partition is:
[root@box loginname]# /sbin/fdisk -l
Disk /dev/sda: 60.0 GB, 60011642880 bytes
255 heads, 63 sectors/track, 7296 cylinders
Units = cylinders of 16065 * 512 = 8225280 bytes
Device Boot Start End Blocks Id System
/dev/sda1 * 1 1958 15727603+ 7 HPFS/NTFS
/dev/sda2 1959 5222 26218080 7 HPFS/NTFS
/dev/sda3 5223 5235 104422+ 83 Linux
/dev/sda4 5236 7296 16554982+ 5 Extended
/dev/sda5 5236 7296 16554951 8e Linux LVM
The partition I want to mount is /dev/sda2, so I change the /etc/fstab and add the last line on the example below:
[root@box loginname]$ more /etc/fstab
/dev/VolGroup00/LogVol00 / ext3 defaults 1 1
LABEL=/boot /boot ext3 defaults 1 2
devpts /dev/pts devpts gid=5,mode=620 0 0
tmpfs /dev/shm tmpfs defaults 0 0
proc /proc proc defaults 0 0
sysfs /sys sysfs defaults 0 0
/dev/VolGroup00/LogVol01 swap swap defaults 0 0
/dev/sda2 /mnt/drive_e ntfs-3g rw,defaults,umask=0000 0 0
Where /mnt/drive_e is a directory I created to "label" the mounting point.
Then ntfs-3g is the file system and note that rw will make the partition read/write. You can also set it up as ro (read only). Check the man mount for the meaning of umask as it gives several options.
*****Screen Resolution Intel 945 Dell 620
Surfing around I found that many of this dells come with a nvidia driver and I guess my company is a cheaper one and went for the Intel 945 option.
The lspci shows the version of the Display controller
00:02.1 Display controller: Intel Corporation Mobile 945GM/GMS/940GML Express Integrated Graphics Controller (rev 03)
Installation went well but the system keeps booting on 1024x768. I read along and I can see that I can at least run this laptip at 1200x800 and in some cases at 1440x900. Haven't been able to run at 1440x900 but here is what I did for 1280x800.
a) yum install 915resolution
It looks that you need this utility to run customs resolution on the 945. Also this utility needs to be run everytime that you boot your pc.
A few tips, after installing run "locate 915resolution" if nothing is found then run an updatedb.
After install run a 915resolution -l and you will get a list of all options. Probably 1280x800 is not there so run the following options to create the 1280x800
/usr/sbin/915resolution 49 1280 800
/usr/sbin/915resolution 38 1280 800
/usr/sbin/915resolution 58 1280 800
As you have to run this everytime the box boots you can add them on the /etc/rc.local.
I also added the file /etc/default/915resolution so that it has XRESO=1280 YRESO=800.
Finally I changed the /etc/X11/xorg.conf as follows (note that everytime I change the display configuration using the gnome utility this file looses this changes - I was trying to have 2 montiros running) but along the above steps are done it doesn't seem to affect it. Just in case below are the details I originally used on xorg.conf.
Section "Monitor"
Identifier "Monitor1"
VendorName "Monitor Vendor"
ModelName "Monitor 1024x768"
HorizSync 24.0 - 64.0
VertRefresh 43.0 - 60.0
Option "dpms"
EndSection
Section "Device"
Identifier "Videocard0"
Driver "i810"
BusID "PCI:0:2:0"
EndSection
Section "Screen"
Identifier "Screen0"
Device "Videocard0"
DefaultDepth 24
SubSection "Display"
Viewport 0 0
Depth 24
Modes "1440x900" "1280x800" "1024x768" "800x600" "640x480"
EndSubSection
EndSection
*****FIX DVD DMA
(again copied from another site) For some of us, DMA isn't enabled by default for our wonderful FC5 powered computers (like some Dells and Thinkpads). I've been spending a month or two (off and on) trying to find out how to work arround this problem. The long answer, from what I understand, for why this happens has to do with an IDE and a SATA/PATA drivers that are conflicting with one another and trying to control the drive (you might notice that the drive is labled /dev/hdc) and the DMA doesn't work well... or at all. According to the bug-report that I read, this is not a bug but an expected side effect of some DVD drive setups. With recently released kernels it is not required to make a custom-build, so this is done based off of a yum-installed kernel.
Signs of this problem include choppy DVD playback or slow image reading and when running "hdparm -d1 /dev/hdc" to turn DMA on it will respond with "Operation not permitted". If you see this and, like me, have been trying to find a way to enable DMA on your drive this should help you and I'm writing this so that people with this (apperently common) problem can referance one place to solve it.
Ok, now to get to the part where I tell you how to...
In the terminal:
$su -
#gedit /etc/modprobe.conf
add the following line to the end of the file (leaving an extra empty line behind it):
options libata atapi_enabled=1
save, close and continue in the terminal:
#gedit /boot/grub/menu.lst
add the following to the boot parameter:
combined_mode=libata
save, close and reboot.
Now your DVD drive should be called "/dev/scd0", DMA will not be needed and Xine should be able to play it without the choppyness. Further effects of a working DVD drive (from what I hear, tell myself to make me feel better and dream) include faster CD ripping speeds and general read speeds, improved oooo-aaahhhh factor of showing off Linux, improved firtility and a marginal decrease in Windows dependancy...
*****Other installations
yum install flash-plugin
yum install wifi-radar
yum install wlassistant
yum install gnome-commander
*****Usefull URLs
Below are the URLs I used to get the information. Read them as the people who wrote them knew what they were doing that is not my case most of the time.
http://pptpclient.sourceforge.net/howto-fedora-core-6.phtml
http://www.g-loaded.eu/2005/12/14/the-complete-fedora-kernel-headers/
http://klamstwo.org/evad/archives/3
http://mikelococo.com/2007/01/fc6-on-d620/
http://www.mjmwired.net/resources/mjm-fedora-fc6.html
http://www.linuxquestions.org/questions/showthread.php?t=515648
http://fedoraproject.org/wiki/Tools/NetworkManager#head-fc3fe44e92c63867615113b1ef69cf4fc0dc03cf
http://www.fedoraforum.org/forum/showthread.php?t=114586
C51B50E96BD6109DF982BBD4F6
Subscribe to:
Posts (Atom)