Googling around for a gui ide for Perl I found that there is a plugin for Eclipse. As I also use Eclipse for Java I decided to give it a try and knowing nothing else I found it quite useful. No more of those first vi days (no offense, vi is great but a gui is faster).
You can find about EPIC on http://e-p-i-c.sourceforge.net/, and this time I will not going to explain the installation (as I already installed and didn't took notes) but if you follow their installation manual there is no miss:
http://e-p-i-c.sourceforge.net/downloads/EPIC_User%27s_Guide.pdf
Good luck and if there is a better option let me know and I will give it a try.
Sunday, September 30, 2007
Eclipse and Java SDK 1.5 on Debian Etch
As I am still trying to learn java, linux, perl, asterisk and everything I can get distracted with I needed to run eclipse on a new box I set up at home with Debian Etch.
I found the below page quite good on the details on how to achieve this. My steps are copied below:
http://www.crazysquirrel.com/computing/debian/java.jspx
I found the below page quite good on the details on how to achieve this. My steps are copied below:
http://www.crazysquirrel.com/computing/debian/java.jspx
$ apt-get -u install java-package
$ fakeroot make-jpkg java_ee_sdk-5_03-linux.bin
You will see the follwing output:
Creating temporary directory: /tmp/make-jpkg.fktzTQ6486
Loading plugins: blackdown-j2re.sh blackdown-j2sdk.sh common.sh ibm-j2re.sh ibm-j2sdk.sh j2re.sh j2sdk-doc.sh j2sdk.sh j2se.sh sun-j2re.sh sun-j2sdk-doc.sh sun-j2sdk.sh
You will see the follwing output:
Creating temporary directory: /tmp/make-jpkg.fktzTQ6486
Loading plugins: blackdown-j2re.sh blackdown-j2sdk.sh common.sh ibm-j2re.sh ibm-j2sdk.sh j2re.sh j2sdk-doc.sh j2sdk.sh j2se.sh sun-j2re.sh sun-j2sdk-doc.sh sun-j2sdk.sh
Detected Debian build architecture: i386
Detected Debian GNU type: i486-linux-gnu
Detected Debian GNU type: i486-linux-gnu
No matching plugin was found.
Removing temporary directory: done
The above command didn't work with the package java_ee_sdk-5_03-linux.bin so first I tried to make it work. First use the command below to see you have the latest java package installed. I have .28 that is current enough.
$ apt-cache policy java-package | head -2
java-package:
Installed: 0.28
Second try to lie to the installer telling that the installation type if i386 (google arround the message of "plugin not found" and that was the advice). You do this step by entering the following line:
$DEB_BUILD_GNU_TYPE=[i386]-linux fakeroot make-jpkg java_ee_sdk-5_03-linux.bin
The trick is on hte DEB_BUILD_GNU_TYPE that you pass to the process. But as I was still using the java_ee_sdk-5_03-linux.bin from sun it didn't work because the problem was not the plugin but the USER (me) and instead of java_ee_sdk-5_03-linux.bin I should have been using jdk-1_5_0_12-linux-i586.bin. This is the JDK for what make-jpkg was done and after downloading it I was able to make it work.
$fakeroot make-jpkg jdk-1_5_0_12-linux-i586.bin
$fakeroot make-jpkg jdk-1_5_0_12-linux-i586.bin
dpkg-deb: building package `sun-j2sdk1.5' in `/tmp/make-jpkg.trHEuC6948/sun-j2sdk1.5_1.5.0+update12_i386.deb'.
copy sun-j2sdk1.5_1.5.0+update12_i386.deb into directory /home/ricardo/java_source/
The Debian package has been created in the current directory. You can
install the package as root (e.g. dpkg -i sun-j2sdk1.5_1.5.0+update12_i386.deb).
install the package as root (e.g. dpkg -i sun-j2sdk1.5_1.5.0+update12_i386.deb).
Removing temporary directory: done
After that the package is done and now you only need to run dpkg to install it:
$dpkg -i sun-j2sdk1.5_1.5.0+update12_i386.deb
Check your Java Version just in case you have 2 and you have to use alternatives (explained in another blog) to select the Sun one as default and not the GNU one (usually installed but not in this case).
java version "1.5.0_12"
Java(TM) 2 Runtime Environment, Standard Edition (build 1.5.0_12-b04)
Java HotSpot(TM) Client VM (build 1.5.0_12-b04, mixed mode, sharing)
Installing Wireless D-Link DWL-G520+ on Debian etch
I got a desktop pc, nothing fancy and old p4 with 700MB RAM and a 40GB disk. I will be using it at home where I normally use my work Laptop (Latitude D620 with Ubuntu 7.04) and there is wireless access.
Instead of Ubuntu I installed Debian on it, I downloaded the netinstall of Debian 4 (etch) and did the basic installation. For the first step I did the installation in the office connecting the pc to the network as I am not good doing everything from zero.
Once the pc was up and running I started investigating about my wireless card. I am using a D-Link DWL-G520+. I has been working great on a windows box for the last year and was time to move it to linux.
Looking around you find two main options (although I found some new drivers) using ndiswrapper and acx100.
Much of the googling I read mentioned that acx100 was the correct one for the g520 so I install that one. The installation is simple enough and the steps are below. Note that I've been using it for the last 24hrs and I am not happy with it. I even try to put the Ubuntu install cd and forget about debian/acx100 as the connection fails every now and them (I have on my desk my laptop and this pc and while the pc fails some times and have to either restart X or reboot the machine due a complete freeze the laptop stays connected all the time, arghhh).
The information on how to install the driver ison the acx100 wiki page. The steps I followed are listed below:
http://acx100.sourceforge.net/wiki/Distribution_list/Debian
(as root)
# apt-get update
# apt-get install acx100-source wireless-tools
# module-assistant prepare
(the below step is a menu driven, you have to build the acx100 module)
# module-assistant # It will show a menu to build and install it.
|---> Select / acx100 / Build
|----> Yes
|----> Yes
# modprobe acx
#vi /etc/network/interfaces
Instead of Ubuntu I installed Debian on it, I downloaded the netinstall of Debian 4 (etch) and did the basic installation. For the first step I did the installation in the office connecting the pc to the network as I am not good doing everything from zero.
Once the pc was up and running I started investigating about my wireless card. I am using a D-Link DWL-G520+. I has been working great on a windows box for the last year and was time to move it to linux.
Looking around you find two main options (although I found some new drivers) using ndiswrapper and acx100.
Much of the googling I read mentioned that acx100 was the correct one for the g520 so I install that one. The installation is simple enough and the steps are below. Note that I've been using it for the last 24hrs and I am not happy with it. I even try to put the Ubuntu install cd and forget about debian/acx100 as the connection fails every now and them (I have on my desk my laptop and this pc and while the pc fails some times and have to either restart X or reboot the machine due a complete freeze the laptop stays connected all the time, arghhh).
The information on how to install the driver ison the acx100 wiki page. The steps I followed are listed below:
http://acx100.sourceforge.net/wiki/Distribution_list/Debian
(as root)
# apt-get update
# apt-get install acx100-source wireless-tools
# module-assistant prepare
(the below step is a menu driven, you have to build the acx100 module)
# module-assistant # It will show a menu to build and install it.
|---> Select / acx100 / Build
|----> Yes
|----> Yes
# modprobe acx
If you want you could load the driver automatically with:
#echo acx >>/etc/modules
#cp tiacx111c16 /lib/firmware/`uname -r`/acx/1.2.1.34
(manually created `uname -r`/acx )
(manually created `uname -r`/acx )
#vi /etc/network/interfaces
# The wireless network interface
allow-hotplug wlan0
iface wlan0 inet dhcp
#shutdown -r now
That was it, after the reboot the machine detected the wireless networks around. Selected mine and enter password and was logged (again I fails time to time).
allow-hotplug wlan0
iface wlan0 inet dhcp
#shutdown -r now
That was it, after the reboot the machine detected the wireless networks around. Selected mine and enter password and was logged (again I fails time to time).
Monday, September 10, 2007
Synergy 1.3.1 Windowz XP and Ubuntu 7.04
For the last weeks I've been using my laptop with Ubuntu and my office desktop with the corporate windows xp. I was using the Terminal Server Client to work on my desktop but switching between windows was quite boring.
In the past when I used to have windows on boths boxes I run synergy to share the keyboard/mouse but didn't install it yet.
First thing the sudo apt-get install synergy althouth it didn't show any error it didn't show any success either so I remove it.
Next googling around I found the following link with a good explanation on what to do to get started, the link is: https://help.ubuntu.com/community/SynergyHowto
So the steps are:
a) download Synergy the tar.tz from the Synergy project page http://synergy2.sourceforge.net/. The direct link is:
http://kent.dl.sourceforge.net/sourceforge/synergy2/synergy-1.3.1.tar.gz
Untar the file on your home directory.
b) Next install necessary libraries:
The configuration is quite easy, I have to say that easier than setting this between to windows boxes. Basically you say which are your 2 boxes and then where is which one respecting the other.
Here you have to use the hostname of your linux box and the name of the windowz box you set up on the windowz client.
So my synergy.conf looks like this:
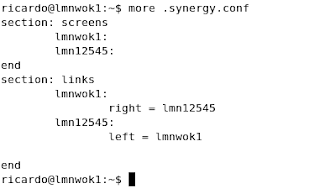
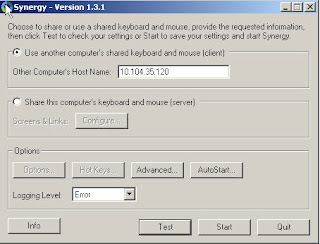
On the windows machine you set up the ip/hostname (you choose) of your linux box and click on the advance button at the end to set up the name assigned to this machine:
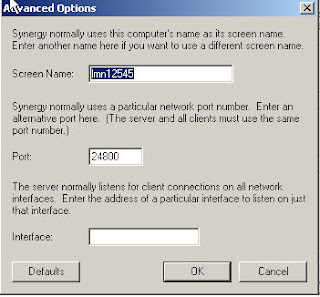
On the advance settings just check the name, if you are having problems just make sure that the name on the below screen is the same as the one on the synergy.conf on your linux box. If they are not the same you will get errors on your client machine.
After this run the server synergys --config synergy.conf from your command line (check previous page you can mv the synergy.conf to your home directory and just run synergy) and start the client, you should be able to use your linux mouse/keyboard on both boxes!!!
Please read the document from the ubuntu documentation mentioned above.
Regards
Richard
In the past when I used to have windows on boths boxes I run synergy to share the keyboard/mouse but didn't install it yet.
First thing the sudo apt-get install synergy althouth it didn't show any error it didn't show any success either so I remove it.
Next googling around I found the following link with a good explanation on what to do to get started, the link is: https://help.ubuntu.com/community/SynergyHowto
So the steps are:
a) download Synergy the tar.tz from the Synergy project page http://synergy2.sourceforge.net/. The direct link is:
http://kent.dl.sourceforge.net/sourceforge/synergy2/synergy-1.3.1.tar.gz
Untar the file on your home directory.
b) Next install necessary libraries:
sudo apt-get install libxtst-dev
sudo apt-get install build-essential
c) Now configure this but specify the location of the libraries.. if not an error of X cannot be found will appear.
sudo ./configure -x-libraries /usr/lib -x-includes /usr/includes
sudo make install
d) The previous step created synergc (client) and syngers (server) on your home director. The webpage mentioned below ask us to move the mto /user/bin so we do a:
sudo mv /usr/local/bin/synergyc /usr/bine) The next step is to configure synergy. The system uses a file called synergy.conf , there is an example on the installation folder at /synergy-1.3.1/examples/synergy.conf.
sudo mv /usr/local/bin/synergys /usr/bin
The configuration is quite easy, I have to say that easier than setting this between to windows boxes. Basically you say which are your 2 boxes and then where is which one respecting the other.
Here you have to use the hostname of your linux box and the name of the windowz box you set up on the windowz client.
So my synergy.conf looks like this:

On the windows machine you set up the ip/hostname (you choose) of your linux box and click on the advance button at the end to set up the name assigned to this machine:

On the advance settings just check the name, if you are having problems just make sure that the name on the below screen is the same as the one on the synergy.conf on your linux box. If they are not the same you will get errors on your client machine.

After this run the server synergys --config synergy.conf from your command line (check previous page you can mv the synergy.conf to your home directory and just run synergy) and start the client, you should be able to use your linux mouse/keyboard on both boxes!!!
Please read the document from the ubuntu documentation mentioned above.
Regards
Richard
Wednesday, September 05, 2007
Configuring Minicom on Ubuntu to connect to Cisco Router
Ok, that was a large title for this task but what the heck. What needs to be done to achieve this? We need a piece of software called minicom (this has been around for ages, google it and you will learn a lot) and follow the next steps shown below:
a) install minicom and follow the normal procedures
sudo apt-get isntall minicom
b) check your serial ports.
We need to know the serial ports on your machine, so a dmseg would do the trick. Look for ttyS and take note of the number after it, in my case I have ttyS0 ready to use.
richard@wok:~$ dmesg|grep ttyS
[ 1.430818] serial8250: ttyS0 at I/O 0x3f8 (irq = 4) is a 16550A
[ 1.431528] 00:0c: ttyS0 at I/O 0x3f8 (irq = 4) is a 16550A
richard@wok:~$
c) launch minicom as root
$sudo minicom
You will see a page as the one below. The first lines shows the configuration (I already modified mine, so yours must be the default ones).

c) Press control + a and Z to go to the menu. The first thing we will change is the dialing string so select the letter "O" for "command string" on the below menu.

d) The previous step should have brought you to the image below. With the arrows keys select "Modem and dialing" and press enter.

e) Now you are on the image below. Press A to set the cursor on the first line and delete everything (I use to have the following configuration ~^M~AT S7=45 S0=0 L1 V1 X4 &c1 E1 Q0^M ). One done press ESC or RETURN to go back to the menu.

f) Now back on the menu select "Serial Port Setup" with the arrow keys.

g) Using the letters configure the options:
A - For Serial Device
E - For Bps/Par/Bits
Copy the configuration below, the option "E" will bring a new menu where you select the details. The option A has to match with what you find on the dmseg step "b" of this guide.

h) Exit to the main menu and reset minicom. Restart it so the changes would take effect (maybe there is an option to make the changes live without restarting minicom but this is a small step).
After rebooting minicom with the Cisco router connected with the blue cable to your pc/laptop just turn the Cisco on and you will see the details on the screen and you are good to go. Example below:

I will add more details/tips along the way.
As always good luck!
Saturday, September 01, 2007
FTP Server: Proftpd
I put a server to share files with friends and I had in my hands a little project on how to share them. For this time I chose to use the always friendly FTP service. Googling around I found Proftpd as one of the heavyweights for this and decided to install it. It can be found at: http://www.proftpd.org/.
I am using Debian, 3.1 with kernel 2.6.22.6. Installation thanks to apt is quite easy..
a) apt-get install proftpd .. that was it. no more. (there is a question on installing as inetd or standalone, you should choose your favorite).
The next steps were to set it up so I can create ftp users "virtual" without shell access (they are not that good friends!) and limit them to upload/download only in certain directories.
First add the following on /etc/proftpd/proftpd.conf
# Set /home/FTP-shared directory as home directory
DefaultRoot /media/muploads
# Lock all the users in home directory, ***** really important *****
DefaultRoot ~
AuthUserFile /etc/proftpd/ftpd.passwd
AuthGroupFile /etc/proftpd/ftpd.group
Umask 022 022
AllowOverwrite off
DenyAll
Umask 022 022
AllowOverwrite off
DenyAll
/media/muploads/uploads/>
Umask 022 022
AllowOverwrite on
DenyAll
The directories /media/muploads/uploads and /media/muploads/downloads should exist already.
Second you have to create the users. For this you need to download a file called ftpasswd. This script would be used to create 2 files, ftp.passwd and ftp.group. Both files replaces the system group and passwd files. Read the documentation to learn more about them.
ftpasswd --passwd --name=user --uid=501 --gid=500 --home=/media/muploads --she
ll=/bin/false
ftpasswd --group --name=ftpvirt --gid=500 --member=user
The first command with the --passwd flag will ask you for a password for the user "user", just add it.
The next step is to add the shell /bin/false to the /etc/shells file. If this step is not done when user "user" tries to log in it would get an error as the shell doesn't exist. Note that the shell actually doesn't exist as we don't want the uses to telnet or ssh to the pc but adding the line /bin/false to the file solves the problem.
The final step is to change the permissions of the directories.
on /media/muploads do a:
chown 500:501 downloads
chown 500:501 uploads
chmod 777 uploads
The userid and groupid are the same for all users and directory. It doesn't matter that they don't exists (keep an eye if you have several users not to use this ids). The chmod 777 is quite extreme and you should use something more secure.
The result, an ftp server that allows connections from virtual users. Diverts them directory to a general home directory and not systems home directories and that are allowed to download from one directory and only upload into another.
As always I am sure there are security holes the size on the moon on this procedure but it is a start.
I am using Debian, 3.1 with kernel 2.6.22.6. Installation thanks to apt is quite easy..
a) apt-get install proftpd .. that was it. no more. (there is a question on installing as inetd or standalone, you should choose your favorite).
The next steps were to set it up so I can create ftp users "virtual" without shell access (they are not that good friends!) and limit them to upload/download only in certain directories.
First add the following on /etc/proftpd/proftpd.conf
# Set /home/FTP-shared directory as home directory
DefaultRoot /media/muploads
# Lock all the users in home directory, ***** really important *****
DefaultRoot ~
AuthUserFile /etc/proftpd/ftpd.passwd
AuthGroupFile /etc/proftpd/ftpd.group
Umask 022 022
AllowOverwrite off
DenyAll
Umask 022 022
AllowOverwrite off
DenyAll
Umask 022 022
AllowOverwrite on
DenyAll
The directories /media/muploads/uploads and /media/muploads/downloads should exist already.
Second you have to create the users. For this you need to download a file called ftpasswd. This script would be used to create 2 files, ftp.passwd and ftp.group. Both files replaces the system group and passwd files. Read the documentation to learn more about them.
ftpasswd --passwd --name=user --uid=501 --gid=500 --home=/media/muploads --she
ll=/bin/false
ftpasswd --group --name=ftpvirt --gid=500 --member=user
The first command with the --passwd flag will ask you for a password for the user "user", just add it.
The next step is to add the shell /bin/false to the /etc/shells file. If this step is not done when user "user" tries to log in it would get an error as the shell doesn't exist. Note that the shell actually doesn't exist as we don't want the uses to telnet or ssh to the pc but adding the line /bin/false to the file solves the problem.
The final step is to change the permissions of the directories.
on /media/muploads do a:
chown 500:501 downloads
chown 500:501 uploads
chmod 777 uploads
The userid and groupid are the same for all users and directory. It doesn't matter that they don't exists (keep an eye if you have several users not to use this ids). The chmod 777 is quite extreme and you should use something more secure.
The result, an ftp server that allows connections from virtual users. Diverts them directory to a general home directory and not systems home directories and that are allowed to download from one directory and only upload into another.
As always I am sure there are security holes the size on the moon on this procedure but it is a start.
Installing new hard disk on Debian
I got a new disk 40GB disk (found it on the office ether of unused stuff) and installed it on my little Debian server that only has a 20GB disk on it.
The usage of the new disk would be something very productive for the organization, we will use it to share movies!. Ok probably IT Security will kick my ass if they found out but we will deal with that later.
So the steps to add the disk are quite simple. This is an IDE disk and the first step is to connect the hardware (power, ide cable etc). Power up and the fun begins.
a) run fdisk /dev/hdb to partition the disk (check dmseg to see the name it has, in my case hdb that is the standard).
b) on fdisk I just created a primary partition and used 100% of the disk. This depends on the purpose of the disk so study your options. Once the partition is created quit fdisk saving the changes.
c) next step is to format the partition. I am using ext3 so the command to run is
mkfs.ext3 /dev/hdb1
d) next you create a mount partition
mkdir /media/muploads
e) next you mount the disk
mount /dev/hdb1 /media/muploads
f) finally change your fstab settings so the disk is mounted on every boot.
vi /etc/fstab
add the following line
/dev/hdb1 /media/muploads ext3 defaults 0 2
That was all. I am sure betting things can be done for RAID, etc. Notes are welcome (almost).
Good luck
Book: Five Years at the Epicenter of the Dot.Com Juggernaut

I just finished reading this book - Five Years at the Epicenter of the Dot.Com Juggernaut by James Marcus - and unfortunately I couldn't see the put my experience on the authors tale. I enjoyed the book and found it amusing and educational on my search to see how business are made but as I work on a dot.com myself I was hoping to find an outside look of what I daily see.
My work on a dot.com is not as glamorous as James's but I believe I leave my footprint on the not so "dot.com" part of the business (after all I am a telephony administrator/engineer on it) and also I have to say and I join the on the late shift (5 years after the company appear) so I was not on the stock options group - although I new some of them and when the company was finally bought there were no millionaires on the building except the top execs - as he was.
Going back to the book, first I would like to write reviews like his but this is just a group of characters put together in bad sentences with what is on my head, so Sorry James!. I leave the book with the wish to read as much as possible. I love the passion on reading the author has and shows on his writing. I consider myself lucky to be able to read more than 15 books a year that although I know is nothing - my father easily reads 4/5 times that number - is much more than all the people I know. I want to start reading the not so marking books, most of my reading is bestseller top shelf nice cover good reviewed type of book. I want to read and enjoy those not so known authors that haven't sold their souls to the publishing machinery, it is just september so I still have a chance to get it.
Another point of the book that I didn't like was that the book could have been about a beer factory and not one of the pioneers on the tech boom. I know the author mentions it all the time but every business wants to revolutionize his market anyway so if you replace the amazon for other success history the books remain the same. What I am trying to see is that I see it more as a history about corporate work than a specific book about working in amazon. Again sorry James but I don't think you will never read this anyway, I really think nobody would ever read this in fact!
In summary a good read, I like books like The Search or Google more to learn about dot.com companies but I recommend the book (this is my editorial at the end!) to everybody.
Subscribe to:
Posts (Atom)
